The Electric Connection’s Blog

What Uses the Most Electricity in Your Home?

Home appliances are necessary for comfort and efficiency. They literally make life easier for everyone. The only problem is that they all demand electricity to run and some use up much more power than others. Hence, while you enjoy the convenience of warm water or cool air regularly, your electric bills keep rising higher.

A typical home uses energy in the following way:

  • Air conditioning and heating – 46%
  • Water heating- 14%
  • Lighting – 9%
  • Appliances – 13%
  • TV and other media – 4%

Of course, these numbers might shock you. If you are searching for the best way to cut down on your energy bills, you must start by knowing what uses the most electricity in your home. These big eaters will have to be controlled to help you save significantly. Read on to learn about them.

Air conditioning
The air conditioner is one of the most demanding electrical appliances in the home. On its own, this appliance takes up to 19% of electrical power. It is frequently used during summer months to keep the heat at bay and enjoy cool air.

Saving on the air conditioner can be tough but also easy with the right practices. Start by getting an upgrade to a smart thermostat. The thermostat will make cooling schedules work better to save energy. Wear light clothing in the house and sometimes use cost-efficient methods of cooling. These include opening up a window and using fans.

Water heater
The water heater is used more often than the air conditioner, especially on cold days. We rely on water heaters daily for various needs such as showers, washing dishes, and clothes.

You can save on energy by reducing the temperature of your water heater. Change the presetting to 20 degrees and combine this with other saving tips such as low-flow showerheads and faucet aerators. Take shorter showers and use cold water for washing sometimes. Maintain your unit with a professional electrician to improve its efficiency.

Lighting
Saving on lighting is quite simple and should be almost unnecessary if you have taken the right precautions earlier. Throw out the old-school incandescent bulbs and replace them with LED lights. LED lights last much longer and use far less electricity.

Refrigerator
A typical home refrigerator runs for 24 hours on every day of the week. It only goes off when the power does too. But like any other appliance on this list, the refrigerator consumes as much power as it gives. If you don’t have a refrigerator yet, the good news is you can just buy the new and energy-efficient models. If not, you can employ a few strategies to cut down.

Proper maintenance is important to help your appliances work better and use less power. Clean the vents and coils of this appliance regularly and replace any broken parts like the rubber gaskets. Don’t keep the door open for too long and set the refrigerator’s temperature lower.

All saving tips must be practiced consistently to see results.

What is Grounding and Why is it Important?

Electricity has come to mean a lot to the world, but while it has proven so vital, electricity is also dangerous. To protect human lives and property from the dangers associated with using electricity, experienced electricians always ensure they ground your electrical system.

Grounding is a common term when it comes to power. It means connecting electrical wires to the ground below your home. We will get to why this is even necessary in a few moments.

Think of grounding like the way humans have to step their feet on the earth to walk. Stepping your feet on the earth connects to a stable surface and helps you walk safely as you should.

This is what grounding means for electricity. After connecting all the appliances and electrical components in your home, each one must be grounded.

Every electric outlet has two main wires. One is the hot wire or active wire which supplies the power, the other is the neutral wire which carries that current back. An additional wire is the grounding wire which can be attached to other electrical devices and connected to the ground bus bar at the breaker.

The ground wire functions as an extra path for the electrical current to pass through and return safely to the ground. The aim is to prevent any danger of electrical shock or fire.

Importance of Grounding

  • Serves as a shock absorber
    Sudden surges of electrical power occur more often than you think. It could be triggered by a storm, transformer malfunction, or when a power demanding appliance picks up. You can observe this in the home when an appliance like the AC comes on; the light flickers briefly.

    Such minor surges can create major problems if the outlets in your home are not grounded. This includes fatal shocks when you touch the appliance. So, grounding prevents all of this by directing any excess charge to the ground where they pose no threat.

  • Stabilizes voltage
    Grounding equips your electrical system to be highly efficient. It helps the appropriate amount of power to be distributed accordingly. This also prevents overloading which in turn protects your appliances.
  • Uses the best conductor
    Why the earth? Why isn’t grounding about connecting excess charges to something else? Well, it is because the earth is a great conductor. Excess electricity will always choose the path of least resistance and the earth presents a safe alternative to your human body.

To know if you are safe and that your electrical system is grounded, you can use the tips below:

  • Check the home outlets. Grounded outlets have three slots, while ungrounded ones have two slots.
  • Older homes may be at risk of being ungrounded compared to modern homes.
  • Call for an inspection from a professional electrician to confirm if you have a grounded electrical system or not. An upgrade can be carried out if needed.

Lights Flickering? We have the solution!

Flickering lights are almost impossible to ignore. They can be very annoying and dangerous if not solved. Flickering lights can be fun and raise no cause for alarm if the lights in question are decorative lights.

Here is why your lights are flickering and the possible solutions to restore your peace of mind.

Something to do with the bulb
Flickering lights may mean an issue with the light bulb, and this can occur in several ways.

Loose bulb – A loose bulb is probably good news because it means the problem is a poor connection. This usually applies when you have one flickering light. Turn off the power and use a gloved hand to unscrew the bulb carefully and then screw it back in.

Fluorescent bulbs – With fluorescent bulbs, it is almost normal to experience a brief flicker for about a minute after the light is turned on. To avoid this, you can replace your fluorescent bulbs with LED lights.

Faulty bulbs – Faulty or burned out bulbs can flicker as a sign that they need replacement. If a new bulb works better, then problem solved.

Dimmer switch – A dimmer switch comes in handy for lighting control and comfort but the bulb connected to this switch must be compatible. An incompatible bulb may flicker or you may even experience strobe light. Simply replace the flickering lights with a compatible one.

Outlets and Switches
Most lights are hard wired to a wall outlet or switch. Check the outlets for any sign of fault or wear. Flip the switch on and off while listening closely and observing the changes. If the outlets or wall switches are the culprits, a replacement will solve the problem.

Wiring
When it’s none of the above, then you must consider a problem with the wiring of the fixture itself. Sometimes this can be fixed. Weigh your options if a repair is a better choice than a replacement.

Surges
Minor power surges can cause lights to flicker. These surges can occur when a demanding appliance comes on or during lightning strikes. This may not be a cause for alarm but over time it can become dangerous for your lighting system. A professional electrician can inspect and proffer a solution in this case.

A sign of outdated wiring
Flickering lights can be a sign of outdated wiring in the home. They show that your system is unreliable and needs an upgrade. This is not something you can troubleshoot or handle on your own. It can only be confirmed by an electrical technician.

How to Fix a Tripped Breaker

When a part of your home or fixture suddenly goes dark, it is usually because of an individual circuit breaker tripping. The best way to find out if this is the case is to check your main electrical panel. The main electrical panel is located in the basement or utility room. A tripped breaker is always represented by a breaker switch facing a different direction from all others. For example, others may seem ON and just this one switch seems OFF or in-between.

Since no one switched off this breaker, you can safely assume it tripped. Now, a breaker tripping is not a strange thing. The circuit breakers are designed to act as safety devices in the home to prevent electrical problems or hazards from occurring. When there is a sudden surge of energy due to lightning or overload the electric breaker will trip. If an outlet suddenly draws too much current, the electric breaker will also trip.

How to reset a tripped breaker

  • The first thing to do has been explained above, and it is finding the tripped breaker.
  • Next, turn off all the lights, outlets, or electric devices controlled by that breaker. To guide you the breaker should be labeled for the area it serves.
  • Reset the breaker by making sure it is in the OFF position. Then, turn the switch back ON. Turn on your appliances or the outlets connected to that circuit.

This simple procedure should fix the problem, but if the breaker trips again it means there is another issue. In this case, it’s time to call an expert electrician at The Electric Connection.

Here are some possible causes of a breaker tripping

Ground fault
A ground fault occurs in the grounded junction box. It is when a hot wire and a bare ground wire both touch the metal box housing them. This sets off a reaction that pushes an unusual and large amount of electricity through the circuit. This will repeatedly trip the breaker and eventually burn an outlet.

Faulty appliance
A faulty appliance can have both short circuits and ground faults that overheat the circuits and cause the breaker to trip.

Short circuit
A short circuit occurs when a neutral wire and hot wire touch. This can happen within the home’s wiring system, an outlet, or a fixture. A short circuit leads to overheating, which trips the breaker.

Most circuit breaker tripping is caused by overloading. Usually, when you can identify what you were doing before the breaker tripped, you can stop or unplug the electrical device to restore order. Resetting the breaker with the steps above will work fine.

However, a short circuit or ground fault are more serious problems that require an electrical technician. Some signs you might observe in either situation are burning smell or scorch marks around an outlet. A faulty appliance will also need to be replaced or repaired to avoid electrical problems. An electrician can confirm the true cause of the tripping breaker and fix it.

Hearing An Electrical Hum? Here’s How To Fix It

Electrical hums and buzzes are quite common in the home. The annoying thing about these sounds is that they can be hard to locate and most times they indicate more serious electrical problems.
Before diving into the causes of electrical hum and how to fix it, here are some tips to help you identify the source of the hum.

  • Start by shutting off all the circuit breakers in your home. When you do this an electrical hum should stop, but if the sound continues, it means it has nothing to do with your electrical components. To identify the source of the electrical humming sound, turn the circuit breakers back on one at a time. When you hear it, check all the outlets or appliances connected to that particular circuit breaker.
  • You can opt for using a cheap stethoscope from the drugstore. This works better if you suspect that the hum is coming from an outlet or within the walls. Use the stethoscope to listen through surfaces.
  • If you can get your hands on a good ear trumpet, then you can save yourself a lot of stress. Ear trumpets were once a popular tool used by those with hearing impairment. It gives your sharper hearing. Put the smaller end on your ear and guide yourself around suspected areas until you find the culprit. If you can’t get the real thing, improvise with a funnel, or a rolled piece of paper.

Causes, Sources, and Solutions for an Electrical Hum

  • Lights and other fixtures
    Lights on dimmers are common sources of annoying humming or buzzing sounds. This happens because some dimmers do not actually dim the light they just switch the light off and on at a rate too fast for your eyes to see. This constant cycle leads to a humming sound. The solution is to switch to rough service bulbs or LED lights.

    Fluorescent light fixtures may also make a humming sound and replacing them with a different type of fixture can solve the problem.

  • Mains hum
    A mains hum is a term used to describe the audible sound of alternating current. It is common in appliances with motors and occurs when these motors switch on and off. A mains hum is usually harmless but if it gets louder than normal, consider inspecting the appliance.
  • Circuit breakers
    A circuit breaker can trip when overloaded or when there is an unusual surge or demand for electrical power. Sometimes this can lead to a humming sound from the breaker box, which indicates that a circuit is overloaded. This issue can only be addressed by an electrician.
  • Wiring and outlets
    If you notice the sound is coming from the electrical wiring or an outlet, it could mean improperly grounded wiring or the wiring is producing more volts than it can carry. Both situations are dangerous and must be fixed by a professional electrician.

How to Test a 240V Circuit

test 240v240V circuits often serve heavy-duty appliances in the home like the dryer, AC, ovens, and water heater. When there is a problem with the circuit or electrical outlet, it becomes dangerous to use them. As a homeowner, a few basic tricks can help you assess your electrical components in the home and make informed decisions about them.

Read on to know how to test a 240V circuit.
A typical 240V outlet carries three slots or openings. There are two vertical or horizontal slots placed side by side with a middle third slot below the first two. The two slots that lie side by side carry 120V each. The third slot connects the outlet to the ground.

You will need a multimeter to complete the next steps. A multimeter measures the amount of volts running through a circuit. To use the multimeter, turn the dial up to 240V and attach the probes appropriately. Ensure that the red and black probes are completely plugged into the correct slots in the multimeter and are not damaged. Avoid touching the metal tips of the probes to avoid an electric shock.

With the multimeter inserted, check the reading displayed on it. Both slots should read 120V each and a total of 240V. If this isn’t the case, then one or both circuits may be faulty.

Reset the multimeter to 120V and switch the probes. Insert the red probe in any of the two vertical slots and the black probe in the ground slot. The multimeter should read 120V; otherwise, that circuit is defective. Repeat this procedure for the second vertical slot.
After testing the circuit and confirming any defect, the best action is to call an electrician to replace, repair, or provide other valid solutions. Practice basic precautions to avoid damage to your circuits or electrical hazards. These include switching off outlets when not in use and keeping them away from water.

How to Rewire a House without Wrecking the Walls

wrecking walls during house rewireTaking out the drywall might make a rewiring project less complicated. The only problem is the stress it places on a homeowner.

Hence, it would be every homeowner’s dream to be able to rewire a house without wrecking the walls. But just to be clear, while this is possible, it still creates a minimal mess. A lot of factors play a role in this process.

  • First, is the house an old home? If so, you should get an electrician who has the experience and interest in working on old houses. This is important because such electricians have the skill and patience to understand older buildings and upgrade outdated wiring without insisting on tearing the walls down.
  • Next is the house infrastructure. Is it brick or frame? Are there plaster walls? Has the panel been updated recently? Is it a one-story or two? Is there a basement?

Some house wiring is easier to replace than others because of the construction. The wall outlets can be rewired from the attic in the case of a second floor or from the basement for the first floor. One-story houses are easier to rewire this way while two or three-story houses can be more complicated.

Steps Involved

  1. Plan and Prepare
    A house rewire without tearing down the walls requires a professional electrician. This electrician will begin by having a detailed plan of the circuitry to be replaced. Preserving the drywall means running a lot of wires through an attic or available crawl space. The electrician will remove insulation from the walls and mark the points to remove any existing wires.
  2. Remove the old wiring.
    This can be a tricky situation because you can’t just pull the old cable from the walls. Your electrician will take precautions by switching off the breakers and disconnecting wires from them. Then the new wires can be taped to the old before pulling them out one at a time. This way, the new wiring can fall easily into place.
  3. The new wiring
    Cut an opening in the wall for each appliance on the circuit. Next, drill a ¾ inch hole under or over this opening. If the electrician has an assistant, it will be easy to feed the wires through these holes as work goes on.

It is important to secure the wires with staples or an appropriate clamp. Rewiring is a tough but necessary project for any home with outdated or unreliable wiring. Ensure you hire a professional electrician or contact us right here to make this project as simple as possible.

How to Install An Electrical Subpanel

electrical toolsWhen it comes to electrical components, installing them yourself may seem complex. But with the right tips and clear directions, you can get something done.

Every home or building is serviced by a main electrical panel. These main panels can sometimes need a subpanel to share the work. A subpanel is a smaller service panel with dedicated functions. It helps to improve the convenience and efficiency of your electrical system.

The subpanel can be connected to the main panel with a thick three-wire cable. Before you can install it, you must confirm that it won’t overload your entire system.
Tools and materials you will need:

Long-nose and Lineman’s pliers, flashlight, strippers, screwdriver, hammers, voltage tester, mounting screws, breakers for the new circuits, approved feeder cables, staples or cable clamps, and the subpanel itself.

Note to reader
This installation involves electrical skills like stripping wires, screwing, and more. It takes a while to complete starting from a few hours. It is also fairly difficult, so don’t expect it to be a walk in the park. It is best to call a professional to install the subpanel for you.

Step 1:
Mount the subpanel a foot away from the main service panel. Pull and clamp the wires from the subpanel. Strip the wires and clamp the cables accordingly in the main panel. Ensure that the neutral and ground wires are carefully connected to their bus bars.

Step 2:
Route the red and black wires. Strip and cut them before connecting to the feeder breaker and snapping the breaker in place. Do the same for the feeder wires and connect them to the terminals. Next, connect the red and black wires to the hot bars and the white to the neutral terminal. Don’t forget the ground wire, which should be connected to the ground bus bar.

Step 3:
There’s still much work to do on the subpanels. Run the wiring for all the new circuits into the subpanel and clamp them. Connect the wires as before with the white wire to the neutral bus bar, hot wires to the circuit breaker, and ground wire to the ground bus bar.
Power is fed from the hot bus bars to individual circuit breakers and to the branch circuits running out of the subpanel.

Check everything and close up the subpanel.

How To Install A Dryer Outlet

dryers
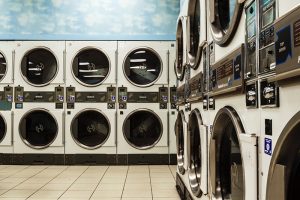
We all know the sweet feeling of pulling out a clean, fresh, and dry clothing item from the electric dryer. At that moment when all that freshness and dryness touches your skin, you enjoy this often unrecognized pleasure of life.

The only thing that can stand in the way of experiencing this each day is a faulty dryer outlet.

An electric dryer is a tough machine, and it often demands much power. Hence, the ideal outlet to provide enough power for this equipment must be a 240V and 110V outlet. The 240V supplies enough electrical power to heat the dryer and get it working at full capacity. Then the 110V supplies electricity to control the timers in the dryer. So, you see a good 240V and 110V dryer outlet ensures your safety while providing power to the dryer.

Can a dryer outlet be fixed?
Sure! But a replacement is much cheaper and safer than trying to fix a faulty outlet. Here is how you can install a dryer outlet.

  • Take precautions
    Before beginning any electrical work (no matter how small you think it is) you should turn off the power. Electrical hazards and accidents can be avoided by doing this. If you don’t know which circuit services that area or outlet, you can switch off power to the entire house instead.
  • Unscrew the receptacle
    The receptacle is largely represented by the white faceplate. Remove the faulty receptacle from the wall by unscrewing any screw you find on the faceplate. There are usually two on opposite sides of the faceplate. When the screws are taken out, you can easily pull the receptacle from the wall but you should do this with care and little force because the receptacle will remain connected to the wires in the wall. Set the screws aside for later use.

    Next, unscrew the terminals with a right-sized screwdriver. A small screwdriver should work best for this. When the terminals have been unscrewed the entire outlet can be pulled from the wall easily.

  • Replacing the outlet
    It is advisable to purchase an outlet in a similar size and shape to the one you need to remove. This makes it easier to install the new dryer outlet without having to change the size of the hole.

    Feed the cable through the cable grip in the wall, then tighten the gripping screws to hold it in place. Don’t clamp the bare metal of the cable. Ensure you clamp only the insulated part.

  • Wiring
    Strip the wire using a razor knife or a cutting tool. Connect the grounding wire to the green screw and the neutral white wire to the terminal. Connect the red and black wires to the other terminals. Now that this is done. Look at the setup to ensure that the wires are tucked nicely and neatly. Push the wires into the box and screw the receptacle back in with the faceplate.

Test the new dryer outlet. If you encounter any problems or cannot do this yourself, don’t hesitate to call an electrician.

How to Save Money On Electric Bills In an Apartment

save money apartment billsOwning a home comes with several benefits including the flexibility to make changes as you please. But it’s a different thing altogether when you are one of the millions of people who rented an apartment and have limited control over the building. High monthly electricity bills can threaten that sweet feeling of having your own space and freedom.

The good news is, there’s no need to panic or subject yourself to the hassle of high bills. In a few seconds, we will share some practical and effective tips to help you save money on the electric bill in an apartment.

  1. Find perks that work to your advantage.
    Living in an apartment means you must go with the electricity provider your landlord chose. While it may not be your first choice, it’s possible to make this existing plan work to your advantage. Take a look at the bill you have received and call the electricity provider with the number on the bill. Ask the following questions:

    • Is there a specific time during the day or night when electricity is cheaper?
    • Are there perks or extra plans available?
    • Is there time for free electricity?
    • Do they offer free audits?
  2. If you are lucky and most of your questions come with positive replies, you can work your schedule around using electricity more during the cheap or free hours. For example, if electricity is free at night, do the laundry or use the dishwasher during that time. A free audit can help you learn ways to save on electricity and use less power.

  3. Change your habits
    Perhaps you have never had to pay the electricity bills so you never practiced restraint. Well, you get to learn how to change your habits if you want to save on the bill.

    • Don’t leave idle appliances on
      If you are not using a certain appliance, unplug it. Leaving these appliances plugged to the outlets still draws electricity which is accounted for in your bills.
    • Establish electricity-free days
      It won’t hurt you to go without the Television or other power demanding electronic appliances once or more times in a week. They consume more electric power and limiting your use can save a lot on the bill.
    • Use cold water and sun dry
      Wash your clothes or dishes in cold water and save on the electric power needed for hot water. You can also opt for sun drying clothes if possible.
    • Maintain your appliance
      When electrical appliances work slower they consume more power. Keep all your electronics efficient with regular maintenance to avoid the demand for more power.
  4. Get tooled up
    The changes you can make to the apartment to save on the electric bill include:

    • Switch to the power saving LED bulbs
    • Use a low-flow shower head
    • Insulate your water heater
    • Purchase a smart thermostat
    • Use fans
    • Use a low-flush toilet

If you are unsure about making these changes, then don’t hesitate to ask your landlord before proceeding.