Complete Burbank House Rewire

electrician rewiring a house in burbankThe thought of a complete home rewire can be worrying to some homeowners. But it’s always better to be safe than sorry.

A complete Burbank house rewire can be less complicated than you think. Hence it’s important to know what to expect and how you can make this project go as smoothly as possible.

When would you need a Burbank house rewire

Regardless of where you live, the factors that make a complete house rewire necessary are always the same. And in most cases, it’s impossible to realize your home needs rewiring until certain problems occur or you are undertaking projects like remodeling or addition.

You would need a Burbank house rewire under any or most of the following conditions;

  • Lights flicker when you turn on power demanding appliances
  • You have old-fashioned wiring like cloth-covered wiring, fuse boxes, knob-and-tube wiring, and so on.
  • There are signs of overheating at the socket outlets
  • You are remodeling, renovating, or adding a new room.
  • Breaker trips frequently or more than normal
  • You are adding new demanding appliances
  • After an inspection by a licensed electrician who confirms your wiring is worn out.

What happens during a Burbank house rewire?

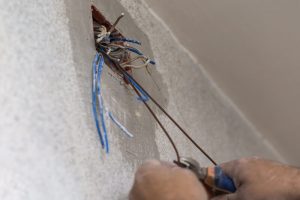
  • Things can get messy around the house because home rewiring projects can be disruptive. There will be wires, drywall and ceiling been cut into, and much more.
  • Electricians often rewire in two stages. The first is fixing wiring and cables, and the second is installing everything connected to a socket or switch.
  • You won’t have power for a while. The electricians will shut off electrical power to the home for safety purposes while working.
  • You don’t have to leave your home while it’s being rewired. You can move from room to room or live nearby if you can’t deal with the mess.
  • It can take anywhere between 2-10 days to rewire your home depending on how large your home is.
  • Rewiring gives you the chance to future proof your home.

What does it cost to do a house rewire?

With a project like this, you might have already guessed it can dig deep into your pocket. The cost of house rewiring can differ depending on factors such as;

  • Your location
  • If the house is occupied or vacant
  • Size of your home
  • Age of your home
  • The electricians you hire

It’s possible to spend up to $3000 rewiring a home in Burbank and much less when the factors come into play.

What if my home is already rewired?

It’s possible to discover that your home has already been rewired and is still in good shape for your use. The best way to tell is to call an electrician for an inspection, but if you’re just buying the home, you can look out for signs such as;

  • Fabric covered wiring
  • Old-fashioned Fuse box
  • Old round pin sockets.

If your home does need a complete rewire, there are benefits in store for doing it. Rewiring your home with professional electricians helps you stay safe, fixes grounding issues, and gives you the capacity you need as a modern homeowner.


Troubleshooting Your Tesla Wall Connector

tesla wiringAs reliable as your Tesla Wall Connector may seem, it’s not far-fetched for problems to come up. Sometimes these issues are easy to troubleshoot on your own. Other times, professional help may be needed. Here are some tips and troubleshooting solutions for your Tesla Wall Connector.

No lights on your Tesla Wall Connector

When you turn your Wall Connector on, the indication of power is the lights. If that doesn’t happen it means you have a power supply problem with no power coming from the breaker panel. This applies especially when your Wall Connector has been working fine before.

To solve this problem, check that the power supply is on. This needs a minimal knowledge of your breaker panel and how it works. It usually involves flipping a breaker back into the on position. If nothing changes, it’s likely time to call an electrician.

The electrician will remove the Wall Connector and check that there is voltage present and fix any issues with the breaker panel that may be the root cause.

The Wall Connector shows a solid red

If you have been using your Tesla Wall Connector for a while, seeing a solid red will stand out to you because the Wall Connector usually comes on with a green light. A solid red can mean a few things and none of them are good news. It could mean the Wall Connector is bad or has an internal fault. Either way, a repair or replacement becomes necessary.

What you can do to solve the situation is to first try turning off the circuit breaker. Wait for a few seconds after before turning it back on. If the solid red light persists, then it’s time to contact Tesla.

One red blink to seven red blink

A red blink code pauses for one second and then repeats itself. The good news is from one red blink to seven red blinks, your Wall Connector can give some indication of what problems need to be fixed.

One blink means there’s a GFCI interruption because of an unsafe current path. There might be damage somewhere.

Check the Wall Connector itself, the handle, cable, and vehicle charge port for signs of contact with water or damage. Call an electrician right after to fix the issue.

Two red blinks mean a ground assurance fault has been detected. Call a certified Tesla electrician to handle this. The electrical technician will have to see if the Wall Connector is properly grounded and check all physical connections alongside.

Three red blinks present a different problem, which is a rise in temperature. This can quickly become a fire hazard and should be attended to by an electrician as soon as possible. You can confirm the issue by checking if the faceplate and cable handle are warm to the touch.

In contrast to what you might be thinking, it doesn’t get worse with four red blinks. Four red blinks simply indicate lost internet connection, and you can check the Wi-Fi settings, router, and signal strength to handle this.

Five red blinks mean an issue with power-sharing communication and can be sorted the same as four red blinks.

Six and seven red blinks generally mean an overvoltage or poor grid quality and need either an electrician or Tesla’s assistance.

Contacting Tesla

We recommend that our customers get in touch with Tesla technical support before contacting us or another electrician. We’ve had several customers recently have to have their Wall Connectors replaced by Tesla due to some kind of manufacturing defect. They can help you troubleshoot and do a diagnostic test. Please call 650-681-6133.

Note: For Wall Connector installations where you have breakers tripping, it may likely be an issue with the setting in your Wall Connector which you need to commission.

For WiFi commissioning support:

You may contact Tesla at 877-961-7652 between the hours of 8am to 5pm Pacific time Monday through Friday. Please be sure that you are home with the Wall Connector, you have the TPN (the part number), the TSN (the serial number), and you have connected the Wall Connector to the internet prior to calling. One of the troubleshooting steps is to get the Wall Connector, if it is a gen 3, to the internet. Please select the link below which will direct you to our website which includes the directions on connecting the Wall Connector to the internet. If the Wall Connector was installed the Online Orders department will not be able to assist with an exchange, however we will be able to complete the troubleshooting steps and if the troubleshooting doesn’t work then it may qualify your system for replacement.

How to Understand, Recognize, and Remove Cloth Covered Wiring

house rewire signs, outlet on fireCloth-covered wiring is a common subject that many homeowners end up faced with. It is often synonymous with old homes and you may not even know you have them. Read on for all you need to know about cloth-covered wiring in this article.
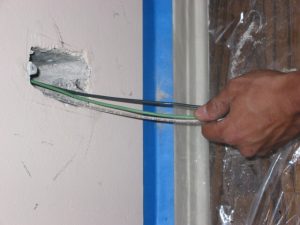
Understanding Cloth Covered Wiring

The simple description for cloth-covered wiring is electric wiring insulated or covered with cloth/fabric material. If it sounds old school, know that it is indeed old school and was the norm between the 1950s and 1970s. It seemed like a good idea at the time, especially since it was affordable and there were no better options.

After the decades of using cloth insulation for electric wiring, plastic insulation was discovered and refined and became the standard for all wiring needs. Cloth-covered wiring is now considered as an electrical hazard because of their many shortcomings.

Why cloth-covered wiring became bad news?

Using cloth as an insulator quickly proved dangerous because cloth material can deteriorate over time. The more brittleness and deterioration occurs, the higher the risk of an electric fire from the heat produce by wires.

Cloth is also an easy target for rodents and insects that can chew on it and expose the wires underneath.

In addition to these drawbacks, some cloth-covered wiring is further insulated with asbestos. Asbestos is known as a dangerous carcinogen to humans. Hence, like the cloth covering wears away over time, the asbestos breaks down and becomes airborne. This puts human lives at risk.

There is also the common issue of cloth wiring not being properly grounded. This presents even more danger to lives and property.

Recognizing Cloth Covered Wiring

  1. Check for knob-and-tube wiring. Knob-and-tube wiring was also widely used at the same time as cloth covered wiring. It comprises ceramic knobs and tubes used for running wires through the walls. This wiring is also considered outdated and unsafe. If you have knob-and-tube wiring, then you likely have cloth wiring because cloth was often used for insulating knob-and-tube wiring with a rubber outer covering.
  2. Check for the manufacturer. You can find the manufacturers or brand names of cloth wiring companies on the cloth-covered wiring. Many of these companies are no longer in business or have been sold off to other companies. Some names to look out for include:
    • Narax
    • Ammcoflex
    • Cirtrex
    • Dutrax
    • Cres-Flex
    • Hatflex
    • Essex
    • Triangle PWC
    • Southwire
  3. Call an electrician. If you are still in doubt or unable to recognize the wiring on your own, it’s best to call a professional electrician or home inspector. These experts will recognize cloth-covered wiring easily and will tell you if you need a house rewire.

Removing Cloth Covered Wiring

It’s good to know that not all cloth covered wiring spell danger for your home or building. The best way to know if you need to remove your cloth-covered wiring is to call an electrician. In cases where you need to remove and replace the outdated cloth-covered wiring in your home or building, this can only be completed by a licensed electrician.

Rewiring a Beverly Hills Home

electrician pulling wires in beverly hills homeYour Beverly Hills home wiring is vital for electrical safety and functionality, and in some situations where it becomes inadequate, you will need to rewire your home.

Rewiring can be a major project, but with proper planning and the right professional, it can be completed successfully and quickly.

  1. Choosing a pro or going DIY

When it comes to any electrical works, you will always be encouraged to hire a professional electrician. Sometimes it might seem like an expensive option you can do without by going DIY. See the pros and cons of doing it either way to make the choice for rewiring your Beverly Hills home.

Hiring an electrical technician (PROS)

  • It keeps you and your home safe
  • The electrician obtains the permit
  • An experienced and licensed electrician is up to date on local codes
  • Inspections can be passed immediately and smoothly
  • Professional electricians have insurance that protects you from responsibility if anything goes wrong.
  • Cheaper in the long run
  • Rewiring by an experienced electrician is much faster
  • Get a quote on your house rewire from a professional

Hiring an electrical technician (CONS)

  • A costly option initially
  • It might be hard to find a dependable electrician

DIYing your rewiring project (PROS)

  • Saves you money initially
  • You can rewire your home at your preferred pace

DIYing your rewiring project (CONS)

  • You will spend time – as much as weeks- planning and doing the dirty work like running wires, cutting, drilling, installing, and more.
  • You will need to know the local electrical codes
  • Obtaining the permit falls to you and passing inspections can be tougher when you DIY.
  • DIYing your Beverly Hills home rewire puts lives and properties at risk.
  • You take responsibility for anything that goes wrong and often permits require that you must stay in the home where you DIYed for a year.
  • Insurance companies can deny your claim based on electrical works done as DIY projects
  1. Understand what it involves

Every homeowner’s needs differ in home rewiring. The only way to know what will be involved in your home rewire is to call an electrician for an inspection. You might need to replace your breaker with a bigger one if it is undersized. Older homes often used breaker panels of 60-100 amps, but modern homes use 100-200 amps and sometimes more. The reason for this change is that modern homes have far more electrical power demands/appliances than older homes. Also, safety codes have changed over time to accommodate electrical needs.

The rewiring project can also include replacing old outlets and fixtures, GFCI, and proper grounding.

Your electrician will inform you of any repairs, replacements, upgrades, and more relevant to your home rewire.

  1. What to expect when rewiring your home

Rewiring can be disruptive. It’s almost expected because you will have wires been run through the house, holes drilled in the walls, opening ceilings to give the electrical contractors access, and so on. It can get messy and the electrical power to the home will be shut off while the work goes on.

The good news is, the right electrician can complete a home rewire quickly and in a hassle-free manner. Contact us today for your Beverly Hills home rewire.

Humming Noise from Electrical Panel

You are right to worry about suspicious buzzing or humming electrical noises around your home. Electrical systems are designed to work quietly, offering you power and efficiency with no hassle.

Your electrical panel controls the power supply in your home while keeping you safe from electrical hazards. Hence, any annoying or worrying sounds from the panel could indicate problems of different kinds. See what these noises could be and what they might mean below.

  1. A light buzzing sound

By a light buzzing sound, we mean a faint buzzing sound from your breaker. It’s not the type to keep you up at night or be highly noticeable. The cause is often current flowing through the breaker, like water flowing in some direction. This light buzzing sound is generally normal and harmless. But, if it gets louder or involves clicking and other horror-movie sounds, be sure to call an electrician.

  1. Medium humming sounds

This sound is louder and more obvious than a light buzzing sound. It can take various forms such as a sizzling noise, sparking, a clicking noise, or a humming breaker. So you can hear sizzling sounds with occasional sparks and this certainly means something is wrong with the circuit breaker. The cause may be frayed and loose wiring which is incredibly dangerous and an electrical hazard. It is necessary to call an experienced electrical technician to replace and repair the wiring quickly.

  1. Loud and continuous buzzing sounds

Now, this is what keeps you up at night. Constant loud buzzing sounds can be disturbing because they are loud. The cause often stems from the breaker not tripping when it should, and this, in turn, indicates that the breaker is bad. Your electric breaker shuts off the power supply during a power surge to protect your home. But when it fails to do this the flow of current to the wires increases leading to a buildup of heat, the loud buzzing sound, and an electrical hazard. Circuit breakers go bad for several reasons such as wear and tear and a faulty panel. This humming noise should not be ignored, and an electrician should be called immediately.

A buzzing and humming sound is normal if…

The sound isn’t loud as we have described above.

If the buzzing sound starts right when your AC comes on but stops once the appliance is working smoothly.

Trying to solve this electrical issue yourself can be very dangerous. Therefore the first and safest way to solve humming and buzzing noise from your electrical panel is to call a licensed and experienced electrician.

It may be time for an electrical panel upgrade — contact an electrician for more information.

How Do Electricians Rewire a House?

electrician pulling wires through wallRewiring your home can be a tough or easy process depending on how you approach it. However, it’s an electrical project that must be done once it’s necessary. It’s good to wonder what’s involved and how electricians rewire a house. Read on as we explore this.

What’s involved in rewiring a house?

The first thing to know is that rewiring can be messy and disruptive despite how much your professional electrician tries to keep this smooth and easy. The walls will have to be drilled into, and the flooring lifted in some cases. Your electrician will;

  • Install new cables
  • Rewire sockets
  • Add or move outlets, switches, light fixtures, and so on.
  • Fit new back boxes on outlets and switches
  • Add wiring for a smart home if needed.

Also, home rewiring projects usually occur in two stages, which are;

  • Replacing circuits and back boxes, cabling, and wiring for the first stage.
  • The second stage involves installing lighting fittings, faceplates, switches, testing, and setting everything up for use.

How is a home rewired?

  • Step 1 – Get the required permits and codes

A rewiring project will need a permit from your local building department. The electrician will pull the permit while you cover the expenses.

  • Step 2 – Access the walls.

Depending on the condition of your home (lived in or vacant) the electrician will have to determine how he plans to access the walls of your home. After making this plan, he will figure out any new cable locations too. Most of the new wiring will have to be run through the attic and crawlspace before entering the walls. With a plan in motion, the electrician will shut off power to your home to begin.

  • Step 3 – Drill new holes and rewire outlets

It might become necessary to drill new holes to rewire outlets, switches, or install fresh wiring for future appliances. A professional electrician with skill can do this easily and protect your walls from excessive damage.

  • Step 4 – Determine the number of circuits

Chances are you are rewiring your home because it’s an old home. Most old homes lack enough circuits to meet the demands of modern homes. A professional electrician is updated and knowledgeable of the recent National Electrical Codes and can identify the appropriate number of circuits following these guidelines.

  • Step 5 – Replace your service equipment

Rewiring your home can mean changing the wiring in addition to replacing your service panel. It’s up to your licensed electrical technician to find out if your electrical panel needs to be repaired or replaced to suit the new wiring.

When is rewiring necessary?

Rewiring offers many benefits such as more power, efficiency, and safety in your home. But it can only be done when necessary. You can call an electrician to see if you need to rewire your home in any of the following situations;

  • You live in an old home
  • You are planning on a major renovation
  • You are adding new major appliances
  • Your electric system is unsafe

How to Hang a Chandelier

Chandeliers are the most elegant lighting fixtures with the ability to switch up the appearance of any room. One chandelier hanging from your ceiling in the right spot can create that sophisticated look you’ve always wanted.

Unfortunately, when it comes to hanging a chandelier, many homeowners think it’s a long and confusing process. This holds you back from purchasing that exotic chandelier and you couldn’t be more wrong.

Hanging a chandelier can be easy and quick with the right information. You can DIY this or ensure your convenience and safety by calling a professional electrician near you.

Start by choosing the appropriate size, and design for the spot you want to hang the chandelier. Next, get the right tools which include;

  • Screwdriver
  • Wire stripper
  • Ladder
  • Plier
  • Tape measure
  • Electrical wire tester

Here are the steps to install a chandelier.

You would either be installing your chandelier with a chain or hook, as these are the most common.

First, turn off the electric power to the room you will work in. This can be done with the switch at the circuit breaker. Also, turn off the light switch in the room itself. These steps are to ensure safety as you install the chandelier.

Next, unpack the chandelier and read all the manufacturer’s instructions. Reading the manufacturer’s instructions helps to serve as an additional and accurate guide on what to do as you install. You can identify details like chain length from the manufacture’s instruction.

Prepare the ceiling electrical box. Unscrew the canopy and examine the wires that will power your new chandelier. You should see three separate wires (black, white, and copper wires). Check for damaged wiring and use a voltage meter to check for a hot wire. If all is fine with your junction box, move on to the next step. If not, you will have to fix any damage first and probably call an electrician at this point.

Now, install the mounting bracket over the junction box in the ceiling. At this point, you need to go back to the manufacturer’s instructions to assemble your chandelier.

If you are hanging a chandelier chain, measure the appropriate length and thread your wire through the chandelier chain. Make sure you give room for excess wire when threading.

Open the electrical box in the ceiling and attach the threaded wire from the chandelier to the corresponding wires in the ceiling. In most cases, you will have a black and copper wire from the chandelier. Use a wire stripper to strip off half an inch of insulation from the chandelier wires. Attach the ends of the black chandelier wire to the ends of the black wire in the junction box. Do the same for the second wire.

Tuck the wires back into the junction box and cover it up.

Install your chandelier bulbs and switch the electricity back on to enjoy your working chandelier.

If you would rather avoid the hassle, call an electrician here today for easy and fast chandelier installation.

What’s the Cost To Replace Federal Pacific Electric Panel?

panel upgrade los angeles
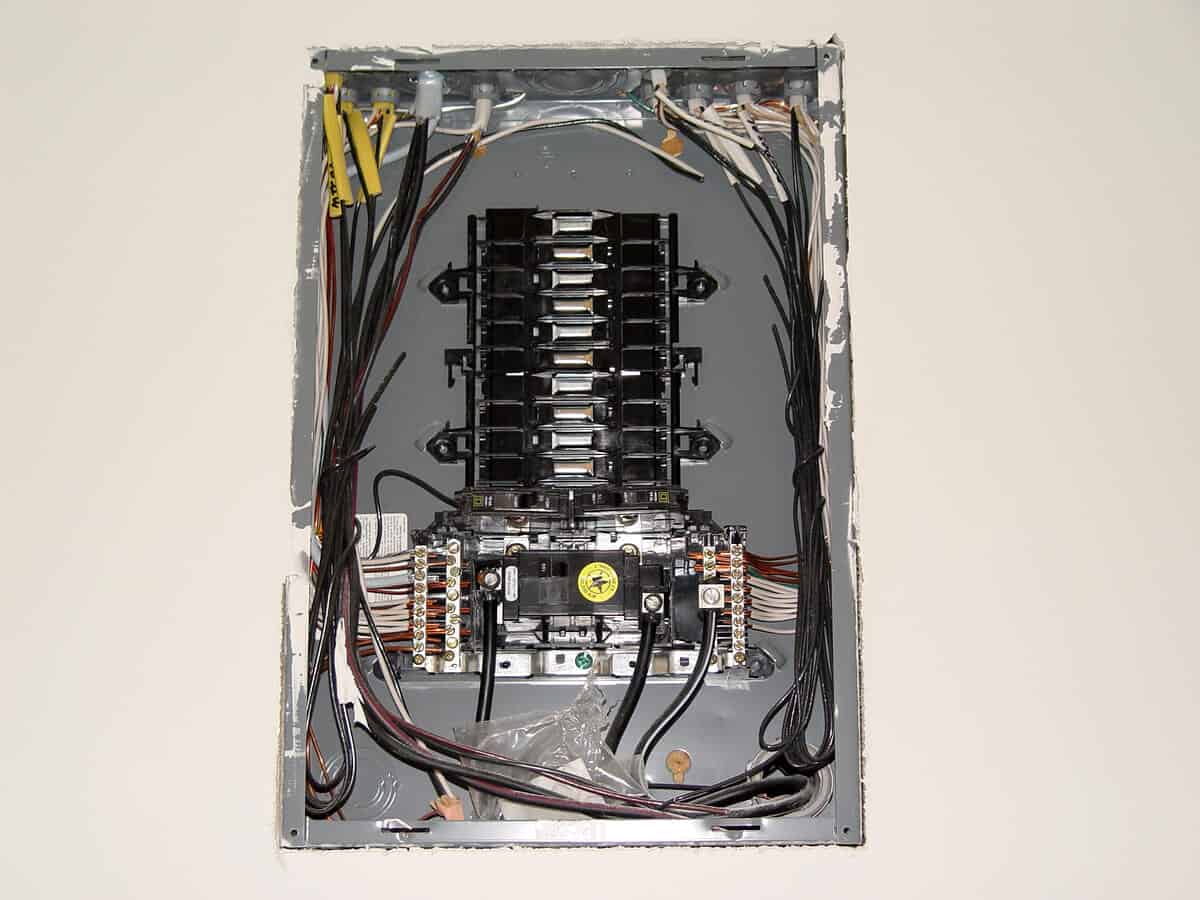
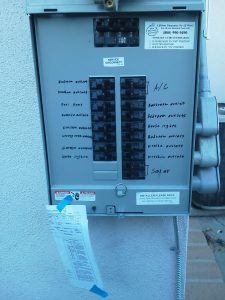
A safe electrical system is invaluable to every home and if you have a Federal Pacific Electrical Panel (FPE), replacing it is the best solution to ensure your electrical safety.

Federal Pacific Electrical Panels are commonly found in homes between 20 and 70 years old. These panels were first introduced by Reliance Electric in the 1950s and quickly became installed in millions of homes across the country. It was soon discovered that FPE panels were unsafe and present a great risk to homes that use them.

Your home’s electrical panel distributes electrical power safely across all circuits. It is also built to ensure protection by tripping off in situations like a short circuit, circuit overload, power surge, and so on. If the breaker cannot do this, the chances of an electrical fire starting increase dangerously.

How an FPE breaker puts your home in danger.

According to reports from the United States Consumer Product Safety Commission (CPSC), Federal Pacific breakers may fail to trip during an overload or short-circuiting. FPE breakers have recorded high rates of not tripping when necessary for your electrical protection. It was also discovered that the breakers tend to enter a lock-up. A lock-up describes a situation where a breaker that has tripped once will never trip in the future regardless of dangerous conditions like an electrical overload.

Studies estimate over 2,800 electrical fires caused each year by a Federal Pacific Electrical Panel that didn’t trip.

Most of the unreliability of the panel is due to the use of cheap materials in its manufacture and their limited original design.

Distinct risks and problems posed by a Federal Pacific breaker also includes;

  • The crowded wires often found within the panel box.
  • The breakers to do not switch off even in the OFF position.
  • Arcing occurs at the bus.
  • The Federal Pacific breakers trip unexpectedly when the dead front cover is removed.
  • Breakers are often not tightly connected to the bus bar.

Electrical inspectors always encourage homeowners to replace and not repair a Federal Pacific Electrical Panel. Electricians may also hesitate or refuse to fix problems with these panels because they cannot guarantee the results or your electrical safe afterwards.

Identifying a Federal Pacific Electrical Panel

You may have a Federal Pacific Electrical Panel if your home is as old as between 20 to 70 years. Since the company no longer exists, you can’t purchase a new FPE panel. It can only be present if it was installed in older homes. You can identify an FPE panel with the labels or logos on the front cover. The common appearance is an orange and white label.

You can also look out for the name Stab-Lok written inside the panel or on the breaker. A signature red label across the front of the panel is another indication.

The cost of replacing a Federal Pacific Electrical Panel may vary across electricians, location, and other factors. The replacement can generally cost anywhere from $1500 to $2000, and even more.

The replacement will include any necessary repairs, rewiring, moving the panel location, and installation that are up to recent codes.

What’s that Electrical Buzzing Sound in the Wall?

hummingYour house is not the scene of a horror movie. So, in most cases when you have heard a certain buzzing sound more than once, it’s probably real and not your mind playing tricks.

What’s normal about electrical buzzing sounds?

Electrical appliances do make sounds caused by the electricity itself. This is thanks to the alternating current in electric wires which cause fluctuations or irregularity in magnetic fields. The fluctuations, in turn, produce vibrations which play out as harmless, quiet sounds.

The twist to this, however, is that not everyone can hear the sounds of their electrical appliances. Only very few people who are attuned to the sound of electricity can. For audible sounds to be created, there has to be an increase in voltage.

When is an electrical buzzing sound no longer normal?

When the noise, hum, or buzz becomes louder than it should be, then it’s time to worry. An electrician can help you point out the source of the buzz and its cause.

An electrical buzzing sound can also be referred to as a mains hum. You can often hear a mains hum which is above 60 hertz around your refrigerator or other large units in the home that operate on a motor.

Beyond this, a mains hum can indicate a problem in your breakers or wiring. If the loud sound seems to come from a breaker, shutting it off may be a bad idea. Hence, contacting an electrical technician is the best thing to do.

If the noise comes from an appliance or fixture, you can shut it off immediately before calling a professional electrician. An electrical buzzing sound from a lighting fixture might only require you to change the bulb to fix the problem.

Buzzing sounds from the wall usually indicate old or damaged wires. You can shut off the power to the circuits in that area to stop the noise and call an electrician.

Wall outlets can be another source of an electrical buzz and the culprit is often improperly grounded wiring or increase in voltage that overwhelms the wiring.

It’s important to attend to electrical humming sounds as soon as possible. If the humming sounds do indicate a problem, then there is a risk of electrical fires and the issue getting worse than it is. Getting professional help on-time serves to protect life and property. Do not attempt to DIY the issue as it can only make things worse and put everyone around you in danger.

Signs of Electrical Problems in Homes in Southern California

outlet on fire due to electrical problem
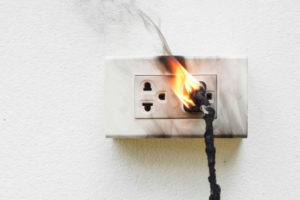
Your electric system works 24/7 providing the power you need to make life easier. While you might wish this efficiency can last forever, this is usually not the case.

The good news is, despite how complicated electricity can be for inexperienced eyes and hands, there are signs of electrical problems you can look out for as a homeowner in Southern California.

Staying alert or watching out for these signs can protect your home from severe issues like electrical fires. It can also help you spend less on repairs or replacement when the problem is discovered on time.

Here are 7 signs to look out for.

  1. Unfamiliar or burning smells

Electrical burning smells can be hard to miss. This makes it easy for you to find the source by following the smell. If the strange or burning smell is coming from an outlet, your panel, or any other electrical installation stop using it immediately and call an electrician. Burning smells may indicate that damage or an electrical fire has begun. At the same time, new appliances often emit a strange odor when they are first installed or plugged in. This could stem from the finish, paint, or material used on the appliance and nothing serious.

  1. Flickering lights

Flickering lights indicate a power surge or damage to your electrical wiring. When your lights flicker, buzz, or dim when turned on, or if an appliance is plugged in, then your system likely needs an upgrade. You can call an electrical technician to inspect and determine the problem.

  1. Buzzing sounds

Buzzing sounds from your fixtures, switches, outlets, or appliances can be worrying. These installations should mostly operate silently. If you hear consistent buzzing noises call an electrician to fix the electrical issue.

  1. Frayed or chewed wiring

Pets, rodents, cheap products, and inexperienced handymen can lead to frayed or chewed wiring in your home in Southern California. This sort of damage is both a shock and fire hazard that should be handled immediately. Contact your electrical contractor in Southern California to inspect your entire wiring and replace any damaged parts.

  1. Warm or sparking wall outlets

If wall outlets or switches are warm to the touch, they may indicate loose or damaged wiring. Call an electrician to check and replace any damaged wiring.

  1. Circuit breaker trips

Your home breaker is designed to trip, to protect your system from overload or power surges. When these protective trips occur, it’s easy to switch your breaker back on and continue using your efficient system as normal. However, frequent circuit breaker trips are a sign of something deeper and dangerous in your electrical system. Call an electrician to confirm as soon as you observe this.

  1. Cheap or fake electrical products

You can find cheap electrical products for your home in Southern California anywhere. While the lower than normal price may seem enticing, most of such products are made with fake materials or not up to industry standards. They can go on to create dangerous problems or electrical hazards in your home. Always purchase quality electrical materials or products for your home.