Wiring For the Future: Audio & Video

For your home wiring system, there is such a thing as pre-wiring or wiring for the future. This simply means applying pre-wiring tips that may become vital in the future for adding categories like audio, video, home security, network & Wifi, cable, satellite, and internet.

In many cases, homeowners who install home wiring themselves or the technicians they hire neglect pre-wiring for the future and this can cause difficulty later on. Pre-wiring is important to do the heavy lifting in your home whenever you need it.

Here are some tips on how to hire a house for the future. If you won’t be carrying out the project, these tips let you know what to look out for with your electrical contractor.

  1. Cover any exposed wiring

In wiring a house, most professional technicians aim to make the system smooth and neat. If you are lucky enough to have this professional approach, that’s great. But with or without this, you can take an extra step to cover any exposed wiring in your home wiring system. Wrap the wiring in plastic bags and hold them firm with a tape. This protects your wiring as other contractors work around the home.

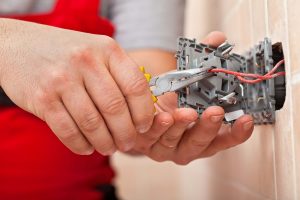
  1. Use low voltage boxes when you can

Although high voltage boxes seem more popular, low voltage boxes are ideal for installing volume controls or when you need to run HDMI cables. They are a more convenient option and suitable for AV wall plates. You should install them where possible.

  1. Install a speaker wire

Good sound is a thing of excitement for homeowners. Audio or speaker systems can be installed in the future easily and affordably by running 4-conductor speaker wire. A 4-conductor wire differs from a 2-conductor wire as it has four separate wires that give you room for up to two speakers. Besides running this wire for whole-house speaker systems, you can keep volume controls in mind too.

  1. Have backup

For modern home theaters, HDMI is the standard connection often used. However, some not so pleasant experiences can show you that it’s always best to have a backup. An HDMI house wiring for the future can come up with issues like not working and that just defeats the whole aim of pre-wiring. The solution is to run two CAT6 cables along with the HDMI cables as a backup for future use.

  1. Install conduits

Cable conduits are not the same as electrical conduits and they often come in handy for running speaker wires, network cables, and cable wires. Install conduits during construction and terminate them into junction boxes. Cover them with faceplates and that’s the end of that until they are needed.

How about going wireless?

There’s nothing wrong with a plan to go wireless in the future. While this is great, wired connections are often faster and suitable for high-traffic applications. To ensure you can enjoy the speed of wired connections and use of applications like Ultra HD use wired connections such as CAT6 or Category 5e for your future proof home wiring.

Do I Need An Electrician for a House Rewire in Los Angeles?

electrician performing a house rewireHouse rewiring is a tough project. It is disruptive and demanding of funds and electrical experience. The answer to if you need an electrician for a house rewire is yes.

An electrician is the technician that determines whether you need a house rewire. But after this, many homeowners prefer to consider making a house rewire a DIY project. It’s only possible to do this if you have the knowledge and experience with electrical service.

Read on as we discuss the reasons why you need an electrician for a house rewire and other tips like the steps to take to rewire your home with or without an electrical technician.

Why you need an electrician for a house rewire

Statistics show that the average American homeowner has 9 unfinished projects on their to-do list. 55% of these homeowners will attempt to DIY the projects and only 31% of these end successfully.

While DIY culture is booming, it’s important to remember that there are several factors involved in projects like a home rewire. For example, safety precautions, appropriate materials, building codes, permits, and more.

DIY is risky in many ways. It’s risky to your health and life as well as that of others and your property. Electrical work is dangerous business and without the right precautions, experience, or knowledge shocks, electrocution, and even fires can occur.

Most electrical projects like a home rewire usually require permits that ensure safety protocols and codes are being followed. Performing such electrical work without a permit is against the law and comes with legal consequences. Also, if someone in the home should get hurt from such improper work, you could be persecuted.

Hiring a professional electrician for a home rewire guarantees your electrical safety and efficiency. It is also cheaper and compliant in the long run.

Tips for safely rewiring your house

  • Find out if you need to get a permit and do so.
  • Carry out an inventory to know the materials you need for the project.
  • Consider any additions you would like.
  • Create a plan that shows what will be done and when it will be completed, especially when working with an electrician.
  • Avoid damaging the existing infrastructure.
  • Hire an electrician familiar with working on older or existing buildings.

Stages of a house rewire

A house rewiring project usually takes two distinct stages. The first stage involves the circuits, wiring, cabling, and back boxes replacement.

The second stage involves light fittings, faceplates, and sockets installation.

How often should you rewire your home?

Unlike regular repairs and replacements, a house rewire is hardly needed often. There is no specific timeframe for rewiring you home as electrical systems have a life span that depends on factors like use. If your home is over 25 years old or up to, it will benefit from a rewiring project or updating. You should carry out electrical inspections every 10 years if you are a homeowner or every 5 years if you are a landlord to ensure electrical safety and efficiency.

If you think you may need a rewire in Los Angeles, call our office and we can send one out to assist your situation. Your Los Angeles electricians are standing by waiting to help!

Relocating a 220 Volt Outlet in Los Angeles

220 volt outlet
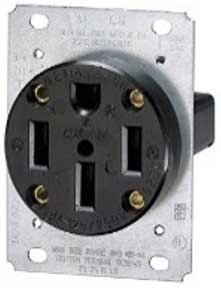
A 220-volt outlet is the most powerful outlet in the home. It is built for power-demanding appliances, like ovens, dryers, and more. You can identify 220-volt outlets as outlets that are larger and different-looking than others. They usually have either 3 prong or 4 prong holes.
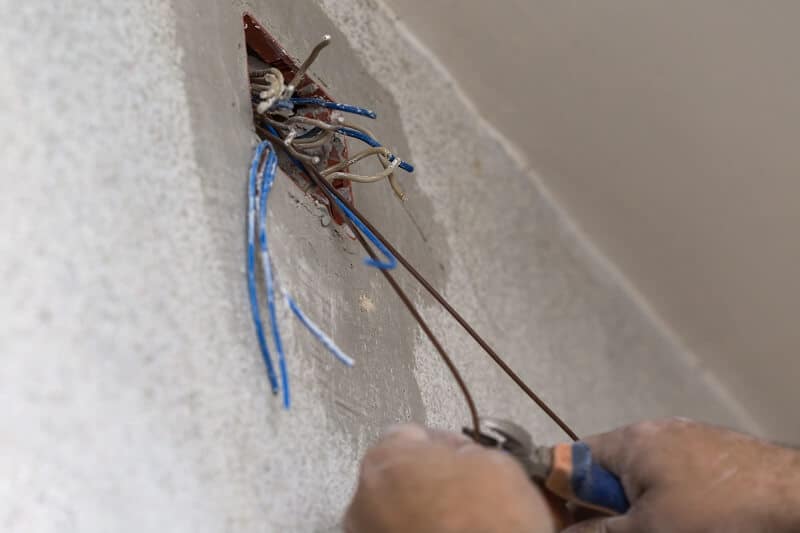
If you are renovating, remodeling, or moving any of these power-demanding appliances, you would have to move or install new 220-volt outlets to serve them.

Relocating or installing a new 220-volt outlet is always ideal because it sets the outlet behind the appliance, giving the room a clean look. It also helps to eliminate dangerous situations from using electrical extension cords.

Use the following steps to relocate your 220-volt outlet.

  • Safety first.
    Before you get started with the relocation, shut off the power to the area of appliances. Next, take out the outlet cover and remove the outlet from the box. You can use an electrical tester to confirm that there is no power in the outlet. If possible, let others in the home know you will be working with electricity and the power has to remain off till you are done. Try to use rubber-handed tools and even a high-voltage glove to be sure of safety.
  • Choose and prep your new location
    Choose the new location of the appliance and mark out the spot for the outlet on the wall in that spot. Cut open the drywall using the same dimensions as the existing outlet.
  • Remove the wires
    Run the wires from the existing location to the new one. Ensure you use a stud finder to identify the stud where the outlet will be mounted.
  • Mount the outlet
    Cut a new wire and run it from the old location to the new one. Then cut two inches of sheathing from the ends of the wire. Pull off half-inch of insulation from the black, red, and white leads on both ends. Nail the gang box for the outlet to the stud. Connect the wires that go into the old outlet’s gang box. Cover each with a wire nut and electrical tape. Run the opposite end of the new wire into the gang box, leaving up to 8 inches of wire coming in. Connect the black and red wires to the positive terminals and white wire to the negative terminals. Attach the mud rings to the gang box and slide the outlet in. Make the connection to the mud ring, place the new cover on the outlet, and screw in.
  • You can use drywall patches to patch the old outlet location.

    Before using the outlet you can reach out to an electrician to inspect the installation for safety reasons. You can also contact us for further inquiries.

    Call a Local Electrician

    Relocating a 220 volt outlet requires the help of a local Los Angeles electrician. The Electric Connection is just one phone call away. Give us a call any time Monday through Friday from 8am to 5pm PST and one of our dispatchers will be happy to talk with you. They’ll get you on schedule with a professional electrician who can help complete your project in no time at all!

Rewiring a Los Angeles House Room by Room

los angeles house rewire by electricianDeciding to rewire your home does not come easily, and there’s no surprise why. Aside from the fact that home rewiring projects dig deep into your pockets, there’s the disruptive nature of the project to consider. But despite what seems like two distinct disadvantages, here are the many benefits that outweigh them and support your decision for home rewiring.

  • New wiring, new electrical power experience
  • A dependable electrical system
  • No more flickering lights, burning smells, or shortage of power
  • More room to add new appliances and remodel
  • Save on energy bills
  • Improved electrical safety
  • Reduce the chance of a power cut
  • Ensure electrical wiring lifespan
  • Prevent damage to your home appliances
  • Increase home resale value

While a home rewire is an option for many reasons, not just any homeowner should rewire their home. There are conditions under which a home rewire is needed and they include:

  • If your home is old, and the wiring is outdated
  • You have hazardous aluminum wiring
  • You are renovating
  • Your electrical system is unsafe with several faults, flickering lights, and so on.
  • Your electrical wiring has insufficient capacity

When you are experiencing any issues with your electrical system, it’s advisable to call on a professional Los Angeles electrician to inspect your wiring and point out the issue. The electrician will advise on if a home rewire is needed.

How to rewire room by room

  1. Make a list – Make a list of the appliances you have now and those you would like to add in a few years. It’s best to think as far as 25 years. This is because most rewiring projects are done every 2 decades. You can consider installations like:
    • Lighting and ceiling fans
    • HVAC
    • Kitchen appliances
    • Water heater
    • Devices such as wheelchair lifts and stairlifts
    • Home office electronics
    • Hot tub, spa, sauna or swimming pool
    • Entertainment systems
  2. Get an electrical building permit – The person who will perform the rewire project has to pull a permit before the work can start. If a rewiring project is carried out without the necessary permit, you might have to take it all down later.
  3. Get to work rewiring room by room – Shut off the electrical power to the home, disconnect circuits, and disconnect wires from electrical boxes. Draw a plan of your new circuitry. Cut holes in the drywall to install new outlets and switches. Run the new wires through the backs of the electrical boxes and staple lateral runs of wire with wire staples. Run the wiring for the new devices and connect each new circuit.

Attempting a rewiring project yourself is no joke, and it gets worse if you have no electrical experience or knowledge. It is always better to leave such demanding electrical services to professional electricians. Hiring a professional saves money in the long run, guarantees electrical safety, and is stress-free for the homeowner.

Be sure to test all your electrical components after the project and ascertain they are working fine. If you opted for DIY, ensure a professional electrician inspects the wiring room by room afterwards.

Contact A Local Los Angeles Electrician

The Electric Connection is proud to employee some of Los Angeles’ greatest electricians. If you need help with a house rewire in Los Angeles or the surrounding areas, be sure to give us a call. We have even created an online form where you can get a free house rewire quote delivered to your inbox in minutes. Don’t take a house rewire project on yourself, give us a call and we can help!

Can I use an extension cord to run power outside?

extension cord legalGetting power within the home is easy. You are already set up with outlets, cables, and extension cords. So, all you have to do when you need to put on the TV, use the microwave, or other appliance is plug in and switch on. However, when you need power outside, it’s different. Running power outside depends on a few factors starting from what you need power for, or rather the duration of use.

Power Outside for Short Term Use

Yes, you can use an extension cord to run power outside if you only need power for a short time. This can include quick activities like trimming the bushes or illuminating a party in your backyard. An extension cord built for outdoor use has you covered from hours to up to two days outside. It’s important you note the use of the term outdoor extension because not all extensions are built for the conditions outside your home. An indoor extension should not be used even for only a few hours outside. Purchase an extension cord identified as an outdoor extension cord.

Also, note that even outdoor extension cords built for use outside should not exceed more than a day or two in use. This is to prevent vital parts of the cord from breaking down and leading to electrical fire or shocks.

Other things to consider when using extension cords for outdoor use

  • After ensuring you use an outdoor extension cord, verify the wattage before purchasing it. The cord should be able to accommodate the wattage needs it will be connected to.
  • Next is the length of the cord. Electricians would often advise on using long extension cords outside the home. However, there’s some discretion to be applied to how long or how short the cord should be. A short cord might not meet your needs and a lengthy cord can easily become a cause for accidents, tripping, and falling. Choose the right length according to your needs and be sure to clip a longer cord or its excess to the ground or tuck it neatly away from sight and foot traffic.
  • Also, ensure that the cord is plugged to a GFCI outlet outdoors. A GFCI outlet grounds the current and protects against shock if the cord is exposed to water.

Power Outside for Long Term Use

When you need power outdoors for more a day or two, an extension cord won’t cut it. Perhaps you need to light up the lawn regularly or something else. In this case, you would need a professional electrician to install outdoor electrical cables and GFCI outlets. This is not a DIY task. The electrician will dig trenches 18-30 inches deep depending on the specifications of electrical code. The cable will be encased in solvent-welded PVC conduit and connected from both ends to GFCI outlets. It requires expertise, tools, and experience. Afterwards, you will have a safe and dependable outdoor source of power.

Contact us at the Electrical Connection for further inquiries or installation of an outdoor power source.

Is cloth-covered wiring a safety concern?

cloth covered wiring safetyIf you are planning to purchase an old home or you are already living in one, then chances are you may have seen cloth-covered wiring in the home.

Electricity was discovered in the 1800s, and it was not until the 1900s it became common in homes and buildings. As you might imagine, technology hadn’t gotten so far either, so cloth-covered wiring seemed like a good solution at the time. It wasn’t until the 1960s that plastic covered cables were introduced.

So, is cloth-covered wiring a safety concern? Short answer, YES.

Cloth-covered wiring served as standard insulation during those early times and kept homes running on electricity for several years. However, in recent times, the drawbacks and dangers of cloth-covered wiring have become more obvious and dangerous. Cloth-covered wiring is also quite outdated and out of standard.

Some risks posed by cloth-covered wiring include its vulnerability to being chewed by rats and insects and getting worn or torn over time. Either of these will cause the wire underneath to be exposed creating a major fire hazard.

Cloth-covered wiring is also associated with what is known as knob and tube wiring. During the time that cloth-covered wiring was popularly used, knob and tube wiring was the standard method for running these wires through homes. The knobs and tubes in question were made of ceramic and used to run the wires through the walls. These installations are prone to breakdown, do not supply enough power, and do not carry the safety features of modern wiring methods like grounding.

In addition, some cloth-covered wiring was further insulated with asbestos paper. When wear and tear or brittleness occurs, the asbestos may breakdown releasing its hazardous particles in the air. Asbestos is a known carcinogen to humans and extremely dangerous. All of these contribute to why cloth-covered wiring is a safety concern.

What you can do

The good news is you don’t have to take your purchase elsewhere or abandon your home for safety reasons. Cloth-covered wiring can easily be replaced by professional electricians. A whole-house rewiring will eliminate the presence and dangers of cloth covered wiring.

What is required?

A professional electrician is a first and most important factor in a whole-house rewiring project. The electrician will inform you of what is needed including the cost. Whole house rewiring can be a bit demanding financially but it’s well worth it for the electrical safety of your home, family, and appliances. You will get an all-round improved electrical system with the current electrical standards, grounding, new electrical panel, three-prong outlets, and GFCI outlet protection against shocks and much more.

Contact us today, for more details and excellent service.

How do you pull a new wire through a wall?

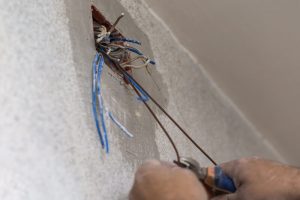
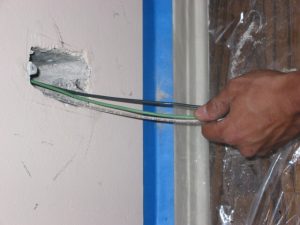
Wiring a home under construction or during a remodeling project is easy, mostly because the walls are accessible. The real difficulty comes when you are trying to pull a new wire through a wall – an already existing wall.

Ideally, this is something you can do with some electrical knowledge and a step-by-step procedure. Here’s how electrical technicians get it done.

Tools you need

  • Stud finder
  • Drywall saw
  • Electricians fish tape
  • Wire stripper
  • Electrician’s tape
  • Auger bit or drill
  • Cable

Wiring Steps

  • Before diving into any electrical work, it is crucial to shut off power to that area completely. Go to your electrical panel and turn off the power. To ensure you have proper lighting without electrical power, carry out this project during the day.
  • Ensure there is a clear path to thread the wire through by using the stud finder to check for studs, pipes, or obstacles in the wall. Plan your route with this.
  • Next check the attic, basement, or crawlspace to confirm you have a clear path for threading the wire.
  • On the main floor, identify where the wire will exit. Draw the outline of a box and ensure it is in line with others you have before. For example, if you are fishing the new wire through an outlet, check that your outline is on the same level as others. This is usually 12-18 inches above the floor. Use a drywall saw to cut out the hole following the outline. After cutting the hole, use a drill or auger bit to drill through the wall plate. Repeat similar procedure with the drill in the attic or basement where you would like the wire to enter through.
  • Tape the fish tape tightly to the cable and make sure you have excesses or enough wire and fish tape to grip. Slide the wire through the opening. It is easier to fish a new wire through a wall if you have someone on the other side to help you pull on the wire if anything happens. Fish the wire gently by pulling at short intervals on one end while your helper feeds more wire from the other end.

If you run into any roadblocks, you will have to repeat the earlier process of drilling another hole in the wall to fish the cable’s free end.

To make it easier to pull the wire you can employ a method that professional electrician’s use. Coat the cable with a lube product. This lubrication makes the cable slippery and easier to pull while protecting the sheathing from tearing.

If the procedure is just too difficult or time-consuming for you, the best option is always to call a professional electrician.

Is Cloth Covered Wire a Fire Hazard?

house rewire signsElectricity has been with us for decades. The industry continues to make new discoveries and update on former methods and as a homeowner, it might seem tasking to keep up. The good news is with every innovation comes safer, more efficient, and convenient electrical systems. You get to enjoy all the benefits still.

Cloth wiring

It might seem strange to some, but if you have an old home, it’s possible you have cloth wiring. Cloth wiring is exactly what it sounds like. They are wires sheathed or insulated in cloth. They are easy to spot because of the clothed exterior. This type of wiring can be found in homes wired anytime from the first half of the 20th century.

Yes, at the time they seemed like a good idea and served their purpose. But as the industry progressed it quickly became clear that cloth wiring posed several risks to homes.

How did cloth end up on wires?

Electrical wiring of these modern times is often covered with PVC insulators. This protects from shock, short circuits, and arcing. These insulated cables are then run as a group into multiple-conductor cables or individually but still within a protective conduit. Plastic which is an ideal insulator for copper was yet to be invented at the time electricity was. Hence, all of these described above was unavailable. Cloth became a grand option.

In cloth-covered wiring, the conductors are first insulated with an early plastic better known as vulcanized rubber. After this, they were wrapped in braided cloth. They worked until the drawbacks set in.

Is cloth wiring a fire hazard?

Short answer – Yes. Long answer – It’s more than that.

Cloth wiring presents all sorts of dangers, especially in these modern times. For starters, the outer cloth sheath is prone to deterioration and so is the inner vulcanized rubber. Cloth wiring is also not only out of date but an easy target to be chewed on by rodents and rats. All of these leave the wires within exposed. This exposure can lead to arcing, short circuits, shocks, and ultimately fires. Electrical fires caused up to 440 deaths and 1,250 injuries every year for the period of 2012 – 2016. Even now, it leads to over $1.3 billion worth of property loss each year.

Having cloth-covered wiring might indicate your electrical system is not properly grounded. Older homes were improperly grounded at that time, and this poses even further risk to your home now.

What to do about cloth covered wiring?

If you notice you still have cloth covered wiring, it is likely time to consider an upgrade/rewiring project. It is a demanding project both financially and practically but in every way worth it for your safety and the safety of your property. An upgrade will provide you with replacements of any other aging material, a better electrical panel, GFCI outlet protection, grounding, modern three-prong outlets, and more.

If you are unsure about having cloth wiring in your vintage home, you can contact us here at the Electric Connection for an inspection.

Electrical Cord Safety

Electrical cords are the cause of a lot of accidents and injuries around the home. The Electrical Safety Foundation International (ESFI) estimates that about 4000 injuries and about 3300 homes have fire accidents as a result of misusing extension cords. There have been around 50 deaths and 270 people injured because of these incidents.

The most common cause of injuries is from tripping over these wires. This has resulted in fractures, contusions sprains, bruises, and lacerations. There are situations where the victims had to be hospitalized.

You do not want to be part of these statistics and the Electric Connection offers some tips on how to use extension cords properly.

  1. Use extension cords temporarily and not as permanent fixtures. If the cords   are used and taken away, the chances of you or others tripping over them are reduced drastically.
  2. Do not overload an extension cord. The ratings of an extension cord indicate how much load it can carry. Knowing this will guide you on what kind of devices and how many devices you can connect to the cord.
  3. Use the cord for its indicated use alone. An outdoor extension cord should only be used for outdoor purposes and vice versa. Outdoor cords are usually thicker and built to withstand weather conditions. Using the   appropriate cord will help protect you from harm and reduce potential dangers.
  4. Check each cord before you plug it in. You should inspect the cord for damages such as frayed wires or bent plugs. You should also check for anything that could lead to electrical shocks. If a plug is hot, do not plug it in.
  5. Run extension cords in open spaces. When you are passing a cord, avoid running it through walls or ceilings. This will help reduce the chances of the cords overheating and posing a fire hazard.
  6. Avoid placing the cords in places where the insulation might be damaged. There are situations where people run their cords between doors or windows or place them under home furniture. This is wrong as this might cause damage to the wiring and damage the insulation, leading to electrical hazards.
  7. Use cords in areas with the least amount of people. Passing a cord through a door or a walkway poses the threat of someone tripping over it as these are routes people pass through a lot. You should run your cords along paths with the least human traffic.
  8. High power devices are not to be connected to extension cords. Microwaves, heaters and the likes draw a lot of power and should be connected to outlets directly and not through cords. This will ensure your cords do not draw more than their rated power.

You should only buy extension cords suitably rated for the load you want to power. If you are connecting multiple devices to an extension cord, you should ensure that their total load doesn’t surpass the cord’s rating.

The Electric Connection can and will provide professional assistance for electrical situations around the home. You can contact us for additional details and questions.

4 Ways You Can Save on Your Electric Bill Next Month

save on electric bill
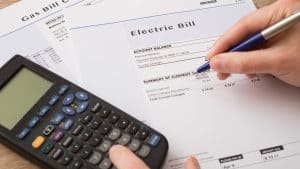
The crazy amounts of money most families spend on their monthly electric bills is a problem most households are wondering how to counter. From air conditioners to water heaters almost every equipment in our homes today use electricity. Because of this, the secret to making your electric bills affordable is through ensuring the appliances in your home are not overusing the power.

You have to ensure you are using energy-saving types of equipment. Second, ensure they are correctly utilized to make sure they do not misuse the energy. A faulty outlet can affect the amount of energy being used. The following are ways you can apply in your home to help you save on your electric bill.

  1. Efficiently Insulate Your Home

    You might be wondering why your house quickly loses heat even when the air conditioner is on. This is because the heat generated rises and promptly leaves your home through the various spaces present on the structure. To prevent this from happening, you must ensure your house is correctly insulated, preventing the heat from escaping.

    Without insulation, you will incur extra costs on your electric bill. The air conditioner will have to be working the entire time to ensure the temperature in your home is to your required standard. For proper insulation, you can add items such as fiberglass to your home to prevent heat from escaping. Adding such material will add value to your home while still reducing your electric bill.

    You can also do weather-stripping- which involves sealing operational elements such as windows and doors. Another method you can resort to using is caulking. It involves filling of cracks and opening in between the components in your home.

  2. Use Energy Saving Appliances

    Using energy-saving types of equipment in your home can also help you save on your electricity bill. For example, take into consideration the old models of appliances, they use considerable large amounts of energy compared to the modern types of equipment. Because of this, if in your home you are still using some of these old types of equipment, then it is time you get yourself the modern ones.

    Make sure every equipment in your house saves you energy. From the refrigerator to the water heater ensure they all help you conserve energy. Energy star appliances might be expensive if you compare their prices to other normal appliances, but the amount of money they will help you save will make buying the seem like the best decision you ever made.

  3. Utilize a Programmable Thermostat

    By using a programmable thermostat, you will likely save ten percent of your electric bills. How is this possible? A programmable thermostat prevents your home from losing heat or the cooling effect during seasons with extreme temperatures such as winter and summer. It achieves this by ensuring the temperature is high or low in your home during periods when no one is affected by such a change, for example, when everyone is at work.

    For instance, during the winter season, you can set your thermostat to allow the temperature in your home to rise when everyone is at work. You can then set it to turn on the air conditioner just minutes before the time you usually arrive back from work. This way, you will come back home to a conducive environment. The reduced cooling effect during the day will ensure you save a substantial amount of energy, hence reducing your electric bill.

    By frequently turning your programmable thermostat down during winter and up during the summer, you will be able to conserve energy. If you compare the amount of money you will spend when installing a programmable thermostat and the amount you will save, it is a worthy investment.

  4. Use cold Water for Laundry

    You can save a substantial amount of money on electric bills if you decide to do your laundry using cold water.  This is possible because ninety percent of the energy your washing machine uses is for the heating of water. Consider the number of times everyone in your family does their laundry monthly if you all decided to switch to using cold water, then you will significantly reduce your electric bills.

Final Thought

With regards to saving money on your electric bills, recognize the things in your home that utilize a substantial amount of energy. Items such as washing machines, water heaters, air conditioners, and dishwashers are some of the appliances that use up a lot of energy.

Make sure the models you are using are energy efficient to ensure they do not hike up your electric bill. With your air conditioner, the more you turn the temperature up during the hot seasons, and lower it during the cold seasons, the more you will save in electric bills. The above are ways that will ensure you do not overspend on your electric bills.