The Electric Connection’s Blog

What to do when Tesla Charger is flashing red?

tesla wall connector
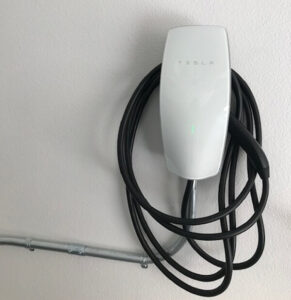
So you finally have your Tesla charger installed and after some time you notice a flashing red light.

Red hardly ever means well, so you’re right to worry about it.

We’ve gathered the troubleshooting tips you need to handle this situation on your own or with a Tesla certified electrician.

If the light is a solid red

A solid red light on your Tesla charger could mean an internal fault and that the wall connector needs to be replaced. An electrician can confirm this. But your troubleshooting solution is to turn off the breaker supplying your Tesla charger with power and turn it back on.

If there’s no change and you still see the solid red light, contact Tesla with your product information.

If you see one red blink

One red blink on your Tesla charger could mean there’s a GFCI. Start your solution with an inspection of all the parts, including the handle, cable, Wall Connector, and vehicle charge port for damage or signs of water ingress.

Then, call an electrician to check that the ground wire is not directly connected to a conductor wire in the branch circuit.

If you see two red blinks

Two red blinks indicate a different problem from one red blink. It might mean there’s a ground assurance fault or possibly a high ground resistance has been detected.

Call an electrician to see if your charger is properly grounded or if any physical connections have such issues.

For three red blinks

This indicates a high temperature detected by your charger.

Inspect the physical parts of the wall connector, including the faceplate and cable, for warmth. Regardless of if you notice excessive warmth or not, call an electrician quickly to verify that the conductors used are sized correctly and there’s no danger from the connector.

For four red blinks

Thankfully, four red blinks just mean a disruption with the internet connection. Check for the cause of this interference. Like a changed password, working router, etc.

Fixing the reason should solve the problem.

For Five Red Blinks

If your Tesla charger is flashing red in five red blinks, it could mean there was a power-sharing communication issue. Hence, the charging speed has been reduced. Troubleshooting this is just like that of four red blinks, check for the interference, and try re-linking your wall connector.

When no lights come on

It’s not just flashing red lights you might have to worry about. An absence of light from your Tesla charger means there is no power supply coming in from the breaker panel.

Check if the breaker was turned off. Switch it on and off yourself and if there are no changes, call an electrician to check.

For Six Red Blinks

Flashing red lights 6 times means there’s too much voltage or poor grid quality detected. If you’re using the level 2 charger, the power supply should be nominal 200-240 volts. Have an electrician remove the Wall Connector from the wire box and confirm that voltage readings are correct.

For most problems with your wall connector, you can either reach out to Tesla or call an electrician to take a look.


Signs for a Long Beach House Rewire

houses in long beachIt’s important to pay attention to changes in your electrical system. The subtle signs that try to let you know on time that there’s a problem before things spiral out of control.

The reason this matters is to keep you and your family safe from safety hazards like a fire. Did you know that each year the U.S. fire departments respond to at least 25,900 home electrical fires? Reports from the U.S Fire administration show that these fires result in hundreds of deaths, thousands of injuries, and billions in property loss.

Electrical fires are sometimes to blame for many of these incidents.

The best way to protect your Long Beach house is to never ignore the signs, especially when they indicate the need for a house rewire.

Here are some signs you need a Long Beach house rewire –

  • Blown fuses or tripped breakers
    Your breakers might trip once in a while to protect your appliances from a sudden electrical surge. When this happens, it’s easy to get everything back to normal by resetting the breaker. However, if your breakers are tripping frequently, then that’s a problem. It’s the same with blown fuses when you use a fuse box.
  • Flickering or dimming lights
    When your licks flicker, dim, or buzz like something out of a horror movie, then it’s worth looking into. Note when this happens- is it when you turn on an appliance? Switch on the lights? The details will be important for your electrician to know.
  • Frayed or chewed wiring
    This is usually caused by pets and rodents and is a dangerous shock hazard. Frayed or chewed wiring can also lead to further damage to your electrical system.
  • Burning smells
    A burning smell near an outlet or electrical wiring is the most obvious sign of electrical problems in a home. It’s an unmistakable smell that should be responded to immediately. Quickly turn off your breaker if you discover such a sign.
  • Scorch marks or warm outlets
    Like burning smells, this sign is also easy to spot and highly dangerous. It can lead to a fire in the home. Turn off the breaker and call an electrician in Long Beach.
  • Other signs of a home rewire are:

    • Loose outlets around the home
    • Living in an old home with old and outdated wiring
    • Using multiple extension cords
    • When there are ungrounded, two-pronged outlets in the home
    • If you’re making home improvements or adding new appliances
    • If your home has knob and tube or aluminum wiring

    How to know for sure that you need a house rewire

    Although these are all signs of faults in your electrical wiring, it is important to let a licensed electrician confirm. Hire a Long Beach electrician for an inspection to tell you if you simply need repairs or a full house rewire.

How Long Can A Pasadena House Rewire Take?

pasadena town hallWhen it becomes necessary to rewire your Pasadena house, you might have several questions about the project. One of the first things homeowners want to know is how long the house rewire takes. It’s important to know this, especially because of the disruptive nature of the project.

What happens during a house rewire?

A rewiring project involves replacing damaged or old wiring in the home with new and updated wiring. If you’re extending or renovating your home, you will need both new wiring and improvement on the existing wiring.

Depending on your specific needs the Pasadena house rewire can also involve upgrading your electrical panel and new installations.

The project is messy and involves two stages. In the first stage, old cables and wiring are removed and new ones installed. The second stage is where everything is properly fitted and made live.

Full home rewires usually happen when the house is empty. But for some homeowners, it’s preferable to stay in one room while the work goes on in other rooms.

At the end of a rewiring project in your Pasadena home, you will have a reliable electrical system that can serve your needs as a modern home.

How long can a house rewire take?

Several factors affect how long a house rewire may take. They include:

  1. Scope of work – Rewiring may mean changing your electrical wiring for a new one, but the scope of work often differs for every home. If you live in an old home, you might need an electrical panel upgrade, new installations like changing outlets, GFCI, and so on. Even for modern homes, an electrical panel upgrade can become necessary for higher capacity. Faulty electrical components will also be repaired during a house rewire. So these make up the scope of work that influences how much work is to be done plus how long it would take.
  2. Will you stay in the home during the project? – A Pasadena house rewire can move much faster if you vacate the home during the project. Staying in the home means the electrician will have to restore power every night or even while working in the day. It’s a bit more stressful having to limit the work environment during rewiring and this can slow down the work.
  3. Size of the property – A single room rewire can be completed much faster than an entire house. Houses with smaller sizes also take less time than bigger houses to complete a full rewire.
  4. The number of contractors working – It takes more than one electrical contractor to complete a house rewire and the bigger the scope of work or size of your home, the more electrical contractors you’ll need. The number of electricians can affect how long the work takes. More electricians typically mean the project moves faster.

Other factors include time taken for preparation and so on. A full house rewire takes an average of 5-10 days or more to complete. Only your electrician who has seen the home and knows what is involved can give you a more specific time range for your project.

Do I Need An Electrician to Rewire My Malibu House?

rewire home outlet
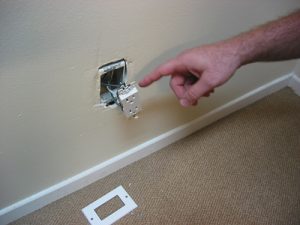
Staying in a beach city enjoying the awesome weather and thrill of celebrity mansions is a great way to live. However, persistent electrical problems can put a strain on your almost-perfect living.

Rewiring your Malibu house can be the best way to end any persistent electrical problems. To be sure, call an electrician to inspect your home and describe any issues you’ve observed. The electrician will confirm if you need a house rewire.

Now, if you’re past this point and you’re trying to decide if you need an electrician to rewire your Malibu house, keep reading to find the information to help you make the right choice.

Why hire an electrician to rewire your home

  1. Legal reasons

    A house rewire is a complex project that often requires a permit from your local authorities. The permit is important to ensure that all local codes and safety protocols are followed in the project. In most cases, the permit can only be pulled by a licensed contractor or electrician. If you choose to do the work yourself, it’s either illegal or restrictions will apply.

    These restrictions include:

    • You must remain in the residence at least a year after the project
    • You could be persecuted if someone gets hurt due to improper work
    • The building must not include any commercial or industrial components such as a public meter.
    • If the home isn’t yours but that of a close relative, you’re not allowed to complete any additional low voltage work.
    • After the project, you must hire an electrical inspector to check that5 the work is up to code and issue you a Certificate of Compliance.

    The best option is to save yourself the headache and let a licensed electrician in Malibu complete the work.

  2. To avoid risks and stay safe

    DIYing your electrical rewire can put you and your family at risk. Accidents like electrocution, shocks, and fire can occur from improper handling or faulty wiring. Electrical rewiring is a complex and dangerous project which is why only experienced electricians know how to reduce risks and follow proper procedures.

  3. Prevents failed inspections

    One of the most common problems with DIY work is failed inspections. When you’ve completed a project that requires a permit without the permit, an electrical inspection will be required.

    The inspector checks for compliance with safety protocols and updated codes. Most DIY house rewires often fail this inspection.

    If you want to sell your home, a buyer would also use an inspector to check the electrical system of the home. If the inspection fails, the buyer won’t proceed with purchasing the home. You may end up fined for a violation. In situations where faulty electrical wiring is found after the purchase, you may be persecuted.

  4. Hiring a professional electrician for your Malibu house rewire is the better choice. Aside from these reasons, there’s also the scope of work and electrical knowledge you need to complete the rewire. A Malibu electrician is safer and cheaper in the long run.

Rewiring a Santa Monica House Room by Room

wiring from electrical outlet
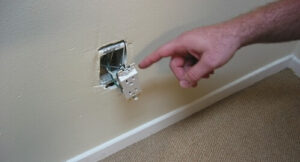
Living in a beautiful city like Santa Monica, you’ll want to make sure your house is efficient as it should be and this starts with your electrical wiring.

You can rewire your home if the current wiring no longer serves your needs or if there are problems with your electrical system.

Either way, you’ll need the help of a professional electrician in Santa Monica to get this done for you. Since rewiring can be disruptive and not everyone has options when it comes to making quick living arrangements, you might want the work done room by room.

It’s possible to rewire your home room by room with an experienced electrician. These are the steps involved –

  1. Find and turn off the breakers to the electricity in the room you will start with. If the breakers are not labeled, then you will need someone to help you check as you turn off the breakers one by one. Be careful while doing this. After finding the correct breaker, double-check by testing the outlets in the room for electrical power.
  2. Unscrew the outlets, switches, and lights in the room to remove the wires. Pull out the disconnected wires by unscrewing them from the terminal screws or using wire snippers. Some wires may be stapled to studs or ceiling rafters. If this is the case and you don’t have access to the studs, cut the wires and leave the rest in the walls.
  3. Draw up your new circuitry and remember to add anything you need now that you didn’t have before.
  4. Cut a hole in the wall for each installation and remember to give room for nailing the electrical boxes you install to a stud.
  5. Run the wires through the holes using fishing methods and access from your attic or basement. This is often a two-man job.
  6. After pulling the wires through the electrical boxes, strip the ends of the wires to connect the device you want to install. Finish your installation and complete the wiring to the breaker.
  7. Switch the breaker back on to test everything. If there are any problems, turn it off again to adjust.
  8. Repeat the process for each room and you will successfully rewire your Santa Monica house room by room.

Tips for a successful house rewire in Santa Monica

  • Identify all the materials you will need before the project starts.
  • Speak to more than one licensed and experienced electrician and choose based on expertise and ability to perform the rewire perfectly.
  • Note all the changes or special requirements you have beforehand.
  • Have extra cash for unexpected costs.
  • Test everything before signing the job as complete and paying the balance.
  • Get a permit if required and an inspection after.
  • Don’t try to go cheap on important parts of the project. A rewire might seem costly at the moment, but remember it will serve for years if done properly.


Pasadena House Rewire Tips

electrician pulling wires through wall
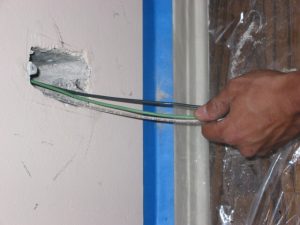
If you stay in your Pasadena house long enough – especially an old home – you will have to rewire sooner than later.

A house rewire comes with benefits that outweigh the complexity of the project.

It helps to reduce the risk of life or property in your Pasadena home, renew your electrical connections, and bring your home up to today’s electrical codes. Rewiring your home can even help you save on things like your home insurance premium, the electrical bill, and future electrical spending.

Here are some quick things to note about a Pasadena house rewire-

  • This project differs greatly from your usual electrical needs in that a house rewire usually takes a few days.
  • House rewiring is not a suitable DIY project because it’s complex and dangerous for inexperienced hands.
  • Within the time of your house rewire, different parts of the house will be without electricity.

Tips for rewiring your Pasadena home-

Upgrade the electrical panel

This might already be part of your house rewiring project, but if not, you should consider it. Upgrade your electrical panel to one with a larger capacity. This can save you money and the stress of actually doing it all over again in the long run. If your home is an old house, it might run on a 60amps panel which is dangerous and insufficient for a modern house needs. ‘

Upgrade to at least 100 amps but up to 200 amps is much better as a way of future-proofing your wiring.

Think months to years ahead.

House rewiring in Pasadena isn’t something you do often. Rewiring a home is only necessary under certain conditions that often take a long time. So it’s best to get it right now. Consider future-proofing your home by thinking ahead to appliances you might install with time. Homes are growing smarter if anything so, wiring for WI-FI, sound, lighting, pool, gadgets, and so on can be included. Discuss this with your electrician before the project starts.

Don’t hire just anyone

The electrician in Pasadena you hire will determine the success of the house rewire. For your safety and to get value for your money – because house rewires do cost significant sums – make sure you don’t hire just anyone.

Hire a licensed electrician who is recommended by others. Ensure that the electrical contractor is familiar with your case. If you live in an old home, hire someone who has rewired old homes. Get a detailed contract and proof of certifications like insurance before signing and paying the deposit.

Get the installations right

The electrician must include some basic installations during a house rewire. They include three-pronged outlets, GFCIs, and dedicated circuits. Don’t cut corners on these as they are relevant for your safety.

Figure out clean up

You will probably have a messy home on your hands after the house rewire. You can avoid this by planning ahead. Discuss with your electrician about clean-up as some contractors can make arrangements for that. If not, plan to either DIY or hire a cleaning team.


Can Your Rewire Part of a Glendale House?

cloth cover wiring
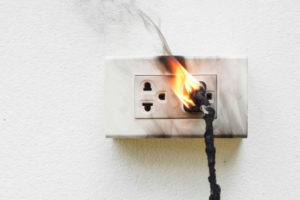
There is such a thing as a partial rewire, and sometimes it’s all you need to get your Glendale house back to normal with an efficient electrical system. Let’s take a closer look at what’s involved in rewiring part of a house.

Reasons for rewiring only part of your Glendale house.

  • Electrical overload

Your electrical installation should be able to manage the electrical demand in your home. However, if the installation was wrongly selected with incorrect cables and switch gears then it may be unable to bear the electrical demand. This can lead to electrical overload over time. The weakest parts of the installation can then become brittle and hot. With such a dangerous system you will need a partial rewire in your house to replace the affected parts.

  • Contact with water

Water and electricity simply don’t mix and this is why your electric installations must be placed in dry areas. But if for some reason your electrical components were installed in a damp wall or have somehow come in contact with water, you might need to rewire part of your house to fix this quickly.

Damp environments can cause electrical parts to rust and deteriorate.

  • Age or loose connections

Your electrical system grows weaker with age. Sometimes, you may need partial rewiring because the parts need changing due to age, wear, and tear.

Loose connections also play a part by deteriorating quickly.

  • Not up to code

Electrical codes guide on how electrical installations should be done and what is considered safe or sufficient for a home. It’s not uncommon to find that many installations are not up to code either due to getting outdated or when you DIY your installations. A professional electrician can ensure your electrical system is compliant because they have the knowledge and experience to do so. DIYing your electrical system means not having this. Insight to guide you

  • Rodent problem

Rodents in the home can be annoying, and it gets worse when they chew on cables and other electric installations. The damaged wiring will have to be replaced.

Confirming you need to rewire part of a Glendale house

Only a licensed electrician can confirm if you need a partial rewire from your home. Regardless of if you observe these signs or not, let an electrician inspect your home to determine this.

What is involved with a partial rewire in a Glendale home?

A part rewire is just like a whole house rewire. The project is complex and usually involves the following-

  • The electrical power in the part of the house to be rewired will be turned off.
  • There will be deafening noises of grinding, chiseling, and so on.
  • It gets messy with dust that can stay in the air for days.
  • A partial rewire can cost less than a whole house rewire depending on your home needs.

If you need a house rewire in Glendale or an inspection to confirm, you can always count on us to help.

Do I Need To Charge My Tesla Every Night

telsa charger installed at home
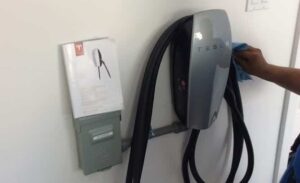
This question is more common than you think and often asked by new Tesla owners. You’d want to know if there is any risk involved with charging your electric vehicle daily or not charging as much. In this article, we have gathered all the facts to help you decide on what’s best for your EV.

What Tesla says

You may have heard the funny phrase ‘A plugged-in Tesla is a happy Tesla’. This phrase comes from what Tesla says in the owner’s manual about battery charging –

“The most important way to preserve the Battery is to leave your vehicle plugged in when you are not using it. This is particularly important if you are not planning to drive Model S for several weeks. Model S wakes up when needed to automatically maintain a charge level that maximizes the lifetime of the Battery. There is no advantage to waiting until the Battery’s level is low before charging. In fact, the Battery performs better when charged regularly,”

From this, you can see it’s safe to charge your Tesla not just every night, but every time it’s not being used.

The manual also gives more suggestions on charging your vehicle the right way.

tesla charging

Setting a charging limit

Tesla owner’s manual also recommends setting a charging limit for your vehicle to 80-90%. Besides, your Tesla is already set to a default charging limit of 90%. If you’re wondering about the minimum low battery limit for your EV, the manual equally states to stay above 20% if possible.

Everything Tesla says about battery charging boils down to driving between 90% and 20% of total battery capacity. For many drivers, that’s more than enough for their daily miles.

Benefits of charging every night and using Tesla’s recommendations

The benefits include:

  • Charging every day increases the range available to you for driving.
  • Using only between 90 and 20% of your battery capacity helps to extend battery life. This is because Lithium-ion batteries are prone to damage when in the very high and very low ends of the charge spectrum.
  • Also, when you charge your Tesla every night, you make up for the amount of battery life drained by Tesla’s auxiliary system each time your car is idle.

Drawbacks to charging your Tesla every night.

tesla mobile connector
Tesla Mobile Connector Bundle, Photo courtesy of Tesla
While all we have explained so far says it’s okay and even necessary to charge your Tesla every night, there are still drawbacks to consider before deciding for yourself.

Charging daily increases energy loss used in preconditioning or heating the battery for charging. There is also the cost of electricity and an increase in your battery cycle count.

Conclusion:

If you’re like most Americans who drive an average of 37 miles per day, you could easily skip charging for a few days and still have enough battery capacity for your use.

Charging fewer days a week at night or in off-peak electricity pricing periods will help you deal with the drawbacks listed above and increase the battery life of your Tesla.

Looking for a way to charge your Tesla at home? Contact us, your Los Angeles Tesla Certified electricians.

Installing Tesla Charger in Los Angeles Condo

tesla charger installed on outside wall
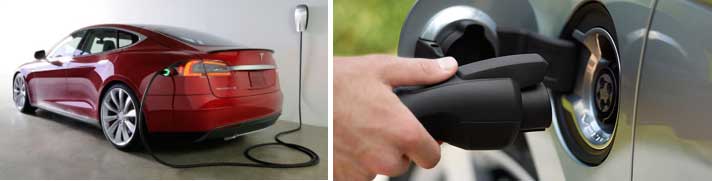
When you are an electric vehicle owner, dealing with charging becomes the next thing to do. For some, it’s easy to stick to public charging options. For others, home charging options are the best, but the same rules do not apply to every home.

If you are living in a condo or apartment, the power to your home comes from a house panel that serves all occupants. This means it won’t be so easy to just install a Tesla charger without approaching your building manager.

Since many occupants share the power from a panel, the building manager can’t allow occupants to install individual charging units. The reason is that such installations will overwhelm the panel in the long run.

Does this mean you have no choice but to depend on public Tesla chargers? Not exactly. It’s possible to get a Tesla charger installation in your Los Angeles condo by following certain steps, working with the right electrician, and knowing the problems to avoid.

Read on as we guide you through it.

  1. Start by locating your service panel
  2. In your Los Angeles condo, the service panel may not be in an accessible area. However, to even begin the process of installing a Tesla charger in your condo or apartment, you have to locate this service panel. Once found, a professional electrician can help you find out if the panel can accommodate another breaker or the charger installation.

  1. Know the parking arrangement
  2. From knowing what your panel can and can’t carry and its location, you can move on to your parking arrangement. Where you park your EV is vital to install a charging unit. Parking arrangements in a condo or apartment usually include assigned parking spots, shared parking lots, or personal garages that can be inside or outside.

    Level 2 EV chargers often come with a cord that is up to 20ft long. Hence, identifying your parking arrangement helps to know what is involved in running power from the main panel to the spot where the Tesla charger can reach your vehicle.

  1. Meet your building manager
  2. This is usually where it gets tricky for EV drivers in condos or apartments. After you’ve determined the factors above, you will need to send a request to your HOA or building inspector/manager. Some managers who are familiar with installing EV chargers can help you through the process and granting permission. While others may make you go through a series of hoops or refuse to grant permission.

To help with your request, here are some things you should include;

  • The charging station you need – Level 1 or Level 2.
  • Where the charging unit will be installed.
  • Any construction implications.
  • The real estate benefits of installing an EV charger.
  • Who will pay for the installation, charger maintenance, and electricity costs?
  • Access to a licensed electrician to install the Tesla charger.
  • A permit from the city.

A licensed electrician will get the permit from the city and be able to provide insight on most of the details you need such as the type of charging station and installation details.

How to Become Tesla Certified Electrician

Please note: We do not certify electricians for Tesla. You will need to contact Tesla for more information or questions.

tesla certified installerIf there’s anything we know about Tesla, it’s that they keep doing better and better. This leads to more people wanting to join the movement for sustainability by owning one of their sleek vehicles.

More EV drivers on the roads increase the need for home charger installations. It’s not surprising because a home charging station offers convenience and reliability. This is where hiring an electrician for the installation also comes in.

The term Tesla certified electrician simply means an electrician or company that has undergone training by Tesla and is certified as a capable installer.

Becoming a Tesla certified electrician comes with many benefits such as:

  • Having the certification shows that you invest in your career as an electrician and you probably have more knowledge and experience than others in your field.
  • You get to stay updated with the latest trends in consumer and industrial electricity.
  • You will be shown to EV drivers in your area as a Tesla certified electrician.
  • Tesla always recommends that owners get their charging equipment installed and serviced by one of their certified electricians.

How to become a Tesla certified electrician

When you decide this program and its certification are just right for you, you’ll have to apply for it. The application is done via the Tesla website and you will be required to fill a form. Here is some information Tesla will ask you to provide in the form:

  • Your full name
  • Email address and phone number
  • Region
  • Address
  • Company name
  • Products you will work with
  • The number of installations you hope to install in a year?
  • Company address
  • Website
  • Number of employees
  • The certifications/licenses you currently have
  • Insurance document

The data may depend on if you are an independent electrician or electrical contractor/company. Further directions will be given after you submit the form. Due to great interest, the form and program may not be available at any given time.

What to expect?

As a Tesla certified installer, you would often be required to take the pictures of your completed installations and send them to Tesla.

You would need to have an electrical license and be an electrician to apply for this certification.

Please note: We do not certify electricians for Tesla. You will need to contact Tesla for more information or questions.

The Electric Connection is proud to be featured as a Tesla certified installer. We are currently installing multiple Tesla and other electric vehicle charging units and receptacles daily. It’s usually a simple job for our electricians to tackle and we’re happy to help out! Complete this simple online form for a free quote emailed to you in minutes.