How to Rewire a House without Wrecking the Walls

wrecking walls during house rewireTaking out the drywall might make a rewiring project less complicated. The only problem is the stress it places on a homeowner.

Hence, it would be every homeowner’s dream to be able to rewire a house without wrecking the walls. But just to be clear, while this is possible, it still creates a minimal mess. A lot of factors play a role in this process.

  • First, is the house an old home? If so, you should get an electrician who has the experience and interest in working on old houses. This is important because such electricians have the skill and patience to understand older buildings and upgrade outdated wiring without insisting on tearing the walls down.
  • Next is the house infrastructure. Is it brick or frame? Are there plaster walls? Has the panel been updated recently? Is it a one-story or two? Is there a basement?

Some house wiring is easier to replace than others because of the construction. The wall outlets can be rewired from the attic in the case of a second floor or from the basement for the first floor. One-story houses are easier to rewire this way while two or three-story houses can be more complicated.

Steps Involved

  1. Plan and Prepare
    A house rewire without tearing down the walls requires a professional electrician. This electrician will begin by having a detailed plan of the circuitry to be replaced. Preserving the drywall means running a lot of wires through an attic or available crawl space. The electrician will remove insulation from the walls and mark the points to remove any existing wires.
  2. Remove the old wiring.
    This can be a tricky situation because you can’t just pull the old cable from the walls. Your electrician will take precautions by switching off the breakers and disconnecting wires from them. Then the new wires can be taped to the old before pulling them out one at a time. This way, the new wiring can fall easily into place.
  3. The new wiring
    Cut an opening in the wall for each appliance on the circuit. Next, drill a ¾ inch hole under or over this opening. If the electrician has an assistant, it will be easy to feed the wires through these holes as work goes on.

It is important to secure the wires with staples or an appropriate clamp. Rewiring is a tough but necessary project for any home with outdated or unreliable wiring. Ensure you hire a professional electrician or contact us right here to make this project as simple as possible.

How to Install An Electrical Subpanel

electrical toolsWhen it comes to electrical components, installing them yourself may seem complex. But with the right tips and clear directions, you can get something done.

Every home or building is serviced by a main electrical panel. These main panels can sometimes need a subpanel to share the work. A subpanel is a smaller service panel with dedicated functions. It helps to improve the convenience and efficiency of your electrical system.

The subpanel can be connected to the main panel with a thick three-wire cable. Before you can install it, you must confirm that it won’t overload your entire system.
Tools and materials you will need:

Long-nose and Lineman’s pliers, flashlight, strippers, screwdriver, hammers, voltage tester, mounting screws, breakers for the new circuits, approved feeder cables, staples or cable clamps, and the subpanel itself.

Note to reader
This installation involves electrical skills like stripping wires, screwing, and more. It takes a while to complete starting from a few hours. It is also fairly difficult, so don’t expect it to be a walk in the park. It is best to call a professional to install the subpanel for you.

Step 1:
Mount the subpanel a foot away from the main service panel. Pull and clamp the wires from the subpanel. Strip the wires and clamp the cables accordingly in the main panel. Ensure that the neutral and ground wires are carefully connected to their bus bars.

Step 2:
Route the red and black wires. Strip and cut them before connecting to the feeder breaker and snapping the breaker in place. Do the same for the feeder wires and connect them to the terminals. Next, connect the red and black wires to the hot bars and the white to the neutral terminal. Don’t forget the ground wire, which should be connected to the ground bus bar.

Step 3:
There’s still much work to do on the subpanels. Run the wiring for all the new circuits into the subpanel and clamp them. Connect the wires as before with the white wire to the neutral bus bar, hot wires to the circuit breaker, and ground wire to the ground bus bar.
Power is fed from the hot bus bars to individual circuit breakers and to the branch circuits running out of the subpanel.

Check everything and close up the subpanel.

How To Install A Dryer Outlet

dryersWe all know the sweet feeling of pulling out a clean, fresh, and dry clothing item from the electric dryer. At that moment when all that freshness and dryness touches your skin, you enjoy this often unrecognized pleasure of life.

The only thing that can stand in the way of experiencing this each day is a faulty dryer outlet.

An electric dryer is a tough machine, and it often demands much power. Hence, the ideal outlet to provide enough power for this equipment must be a 240V and 110V outlet. The 240V supplies enough electrical power to heat the dryer and get it working at full capacity. Then the 110V supplies electricity to control the timers in the dryer. So, you see a good 240V and 110V dryer outlet ensures your safety while providing power to the dryer.

Can a dryer outlet be fixed?
Sure! But a replacement is much cheaper and safer than trying to fix a faulty outlet. Here is how you can install a dryer outlet.

  • Take precautions
    Before beginning any electrical work (no matter how small you think it is) you should turn off the power. Electrical hazards and accidents can be avoided by doing this. If you don’t know which circuit services that area or outlet, you can switch off power to the entire house instead.
  • Unscrew the receptacle
    The receptacle is largely represented by the white faceplate. Remove the faulty receptacle from the wall by unscrewing any screw you find on the faceplate. There are usually two on opposite sides of the faceplate. When the screws are taken out, you can easily pull the receptacle from the wall but you should do this with care and little force because the receptacle will remain connected to the wires in the wall. Set the screws aside for later use.

    Next, unscrew the terminals with a right-sized screwdriver. A small screwdriver should work best for this. When the terminals have been unscrewed the entire outlet can be pulled from the wall easily.

  • Replacing the outlet
    It is advisable to purchase an outlet in a similar size and shape to the one you need to remove. This makes it easier to install the new dryer outlet without having to change the size of the hole.

    Feed the cable through the cable grip in the wall, then tighten the gripping screws to hold it in place. Don’t clamp the bare metal of the cable. Ensure you clamp only the insulated part.

  • Wiring
    Strip the wire using a razor knife or a cutting tool. Connect the grounding wire to the green screw and the neutral white wire to the terminal. Connect the red and black wires to the other terminals. Now that this is done. Look at the setup to ensure that the wires are tucked nicely and neatly. Push the wires into the box and screw the receptacle back in with the faceplate.

Test the new dryer outlet. If you encounter any problems or cannot do this yourself, don’t hesitate to call an electrician.

Getting to Know Your Main Electrical Panel

electrical panel
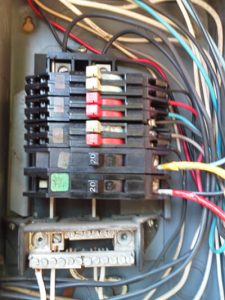
You are probably vaguely familiar with that scary big gray and black box in your basement or utility room. Most homeowners look to this box when they have a tripping breaker or sudden loss of power.

The main electrical panel in the home is also known as a breaker box. It receives and distributes electrical power from the utility company into all areas of your home.

When the electrician needs to fix any electrical component in the home, they turn off the power to that component at the breaker box. It is good to know the main functions of the electrical panel but as a homeowner, you should be better informed.

Read on as we explore more about your home’s main electrical panel.

At a glance

When you open the panel door, you would see the circuit breakers that serve your home. These should appear like several switches each connected to an electric component.

You can turn these circuit breakers on and off to control the area or appliance they give power. The appliances can be identified by a symbol, handwritten word or a detailed sheet on the side of the door.

If you find that you have fuses and not circuit breakers, it means the electrical panel hasn’t been upgraded in a long time and an upgrade should be considered now.
The electrical panel also consists of empty slots.

These slots allow homeowners to include additional circuit breakers for new appliances or areas of the home. When the need arises to install or replace a circuit breaker, the electrician does this by first removing the protective cover inside the electrical panel. This cover is known as the dead front cover and can be unscrewed out of place. During such service, the entire panel will be shut off.

Circuit breakers

The circuit breakers are designed to protect the appliances they serve by tripping off if there is an unusual occurrence with electric power. When there is a high demand for power than the circuit can provide, the wiring becomes affected and electrical hazards like a fire can occur.

Components of circuit breakers

Double-pole breakers literally have double poles. They provide 240V with 15 amps to 50 amps ratings. They serve dedicated outlets for home appliances that demand much power; for example, electric dryers, air conditioners, and stove.

Single-pole breakers have single poles. These poles provide 120V with 15 amps to 20 amps. They serve most of the circuits and outlets in the home.

Bus bars – Hot, Neutral, and Ground

The hot bus bars are two thick black service wires connected to the main circuit breakers. They provide 120V of power.

The Ground bus bar is a separate bus bar installed for ground wire connections. It is usually connected to the neutral bus in the main service panel

Electrical power leaves the panel through the hot bus bar and reaches outlets, appliances, or switches. When this electrical power returns it goes through the neutral bus bar which comprises of a white circuit wire.

Together the components of the main electrical panel keep your home up and running with safe electricity.

Learning more about this panel doesn’t mean you should fumble around with it. To avoid electrical hazards always call an electrician to attend to any issues. However, now you can better understand what they say when they arrive.

What Size Wire For Tesla Charger

tesla wiringWhen you are obsessed with pretty cars and tired of driving fuel powered vehicles, then an electric vehicle like Tesla is your best bet. A lot of drivers want to get behind a Tesla vehicle just to enjoy the thrill of riding such a car.

With Tesla, you never have much to worry about, except, of course, charging. Charging electric vehicles can be smooth and easy depending on your choices. Tesla makes things even better with its superfast chargers and convenient charging options.

Now, you know you can charge your EV at home using either the 120V outlet or the 240V outlet. 120V gives you a slow trickle charge and might limit your full experience with your sweet vehicle. The 240V outlet, on the other hand, is every driver’s delight. You can get a full charge in a few hours and maximize your Tesla experience.

Installing the Tesla wall charger at home

The first thing to note is you need an experienced electrician to install your Tesla wall charger. While it is important to have some basic knowledge to help you make informed decisions, it is not advisable to take on the full installation yourself.

The wall charger will comprise a connection between the breaker and the outlet or wall connector. This will involve a run of wire and for Tesla chargers, you do not need just about any wire. Generally, EV charging should be installed using copper wires because most aluminum wires are not rated for EV use. Aluminum wires are also known to overheat frequently which can be dangerous for your car and home.

Tesla wall connectors are rated for only copper wires.

Ensure the wire you choose has current handling abilities and resistance. Depending on your needs and connection made by the electrician, your wire size needs may vary. They can be any size between 3AWG and 8AWG. Ensure you discuss what is needed with the electrician and allow them to purchase the materials themselves.

At The Electric Connection, we provide free estimates on your installation and a complete EV charger installation service. We know what you need and will discuss your options with you. Contact us for a dependable charging system that lets you enjoy your Tesla.

See what others are saying:

Tesla Motors Club Forum: Wire gauge (AWG) for HPWC (Telsa Wall Connector)

StackExchange: Why does Tesla recommend such a small gauge wire for their chargers compared to this chart I found online?

How to Wire a House for the Future

wiring home for the futureA lot has changed with the way homes are built and wired. Some decades ago a physical key and a lock was the only way you could go in and out of your home but today we have digital locks and virtual keys. Those who never thought of such possibilities for the future might have had a hard time incorporating changes like this in their home. Hence, as your go-to for all things electrical, we will discuss how to wire your house for the future.

First, it is important to know that wiring your home for the future is a project that requires an expert electrician. It may seem demanding at the time, but you will reap the benefits in a few years or even months.

Future home wiring involves creating a system that allows you to combine the different wiring around the home into a network. It is built to enable the integration of various smart systems and sensors in the home now or at a later date. It also ensures that you can conveniently add more systems such as lighting, security, and internet communication systems for your comfort. When you think about it, wiring the home for the future is something everyone should do.
Learn the basics.

When wiring your home for the future, there are a number of systems that will control various functions across your property. These include:

  • Audio and video
  • Security
  • Heating and cooling
  • Computer and Internet
  • Telephone
  • Smoke detection
  • Irrigation

These systems must be wired to a central location in the house. You must choose the control area wisely with the help of the electrician. The control area should possess the following features:

  • A moderate room temperature
  • Enough physical space for a wall panel and equipment rack
  • Easy access, dust-free location
  • Close to the area where service feeds like the Internet enters the home
  • Lots of outlets

Components for the wiring

  • Infrared (IR) controls
    Infrared is the technology that represents remote control features. Several current homes and those of the future require remotes to control some installed automated systems. IR controls are used to make this possible.
  • Category 5e and Category 6 (CAT-5e AND CAT-6) cables
    These cables are Ethernet cables that future-proof your house for years to come. They connect computers and all computer-based systems to a network.
  • Patch cables and Patch panel
    Patch cables are used to connect devices to each other. They are used with a Patch panel to link all smart home devices. The Patch panel is like an organizer that houses plugged in electrical components and helps to distribute signals.

Wiring

Ensure your electrician runs three wires to each switch in the home- hot, neutral, and load wires. Although some electricians do this, it is important to state your preference to be sure you have a neutral wire for future home automation installations.

Next is the use of deep junction boxes. Deep junction boxes give you room to work and accommodate new systems. It is worth the peace of mind when you need to install in-wall devices.

Install cable conduits and terminate them into junction boxes. Cover these boxes with a faceplate if there is no urgent use for them. Make sure you have one in each room located at eye level. It is much easier to make this addition during construction than later when it is needed.

Include wiring in the ceiling or in the wall for speakers. This comes in handy when you need a speaker or audio system across rooms. Other variables for this wiring project like size, number, and type of wires can be discussed with your electrician.

If you want to get your home future-ready, give The Electric Connection a call today!

5 Signs Your House is Ready for New Wiring

new wiring homeHome wiring is something many homeowners often forget to consider with other home maintenance issues. This is not strange because home electrical wiring is usually tucked away behind the walls. Hence, as long as your outlets work and the lights come on, you won’t be thinking about the wiring behind it all.

Contrary to this, it is vital that homeowners place more importance on the status of their electrical wiring. The reasons why doing this is vital are:

  • Home wiring provides electricity to the home, and a fault could mean an inefficient or unreliable electrical system.
  • Faulty wiring is the most common cause of home electrical fires, which can lead to the loss and destruction of lives and property.

Thankfully, you can avoid being a victim of either of these situations. Electrical problems in the home can easily be detected and fixed before they can do any damage. This means you must learn what to look out for and when it is time to call a professional electrician.
Warning Signs You Need New Wiring

  1. Dimming or flickering lights
    If you have ever experienced this, then you know how frustrating it can be. Dimming and flickering lights occur when the lights are receiving too little voltage or power to function. Now, this might happen occasionally when you plug in a power demanding appliances like a washing machine or blow dryer, but the lights should normalize soon after.

    However, when dimming and flickering lights become frequent, even in the absence of a power demanding appliance, it is a clear warning sign that something is wrong with the home wiring.

  2. Tripping breaker
    Breakers are designed to switch off automatically when they sense an excessive demand for power that is more than they can provide. This is a safety feature aimed at protecting your home. But when it occurs regularly, it is advisable to call an electrical technician immediately.
  3. Humming outlets or burn marks
    Outlets undergo rough and hard treatment in the home. Most people yank at them, jam electrical plugs in, and even try to poke the outlet with different objects. This overuse usually makes an outlet the starting point of an electrical fire. If you observe discoloration, burns, arcs, or a humming/sparking sound from any outlet in the home, call an electrician immediately. This is a very serious sign and must be handled in a timely manner.
  4. A burning smell
    The burning smell of an electrical wire is hard to miss. It is sharp and tricky because you may be unable to pinpoint its source. It is a sign of faulty wiring and a looming electrical fire.
  5. Electrical shock
    Sometimes when the wiring is damaged, you can experience electrical shocks from outlets. If you receive electrical shocks while plugging or unplugging an electrical device, call for professional help immediately.

Other telltale signs include age of the home and increasing demands for power in the home. All signs of an electrical wiring problem require that you reach out to professionals at The Electric Connection for a new and updated wiring system.

Do You Need An Electrician to Install a Chandelier?

chandelier installationChandeliers are valuable lights admired for the elegance and lighting quality they bring to a room. Any chandelier can add glamour and beauty to a home or even a commercial building. They come in various sizes, shapes, and designs. Some people believe that chandeliers are for high ceilings and dining rooms. A chandelier is actually quite versatile as it can be used in any part of the home and with both low and high ceilings.

There is a common debate people have about the installation of a chandelier. Some believe it can be a simple DIY process because a chandelier is still a light fixture. Others acknowledge that it is an electrical matter and should be handled by an electrician. Going DIY on your chandelier installation will save you cost but it is not safe or ideal. Any mistake can disrupt your entire electrical system or affect all the fixtures in the home or building.

A standard electrical box which is present in any light fixture installation can hold only 50 pounds. Regular chandeliers weigh more than that; hence it is necessary to determine if you need a support system before finishing the installation. It is almost impossible for a homeowner to do this. So, the best option is to hire a professional electrician. The electrician can handle any size of chandeliers and their wiring needs.

How to choose an electrician for your chandelier installation
Although you need an electrician to install a chandelier in your home, you must also take precautions when hiring. The wrong choice can lead to mistakes and regrets. The electrician you hire must be experienced and licensed. This is important because chandeliers are delicate and you must be familiar with their diversity to install them properly. Do a background check on the electrician and ask for references you can check out. Ensure the electrician is insured. Usually, you do not require a permit to carry out this installation but if the nature of your task demands a permit, then ensure the electrician has them.

Finally, consider the cost. The cost of hiring an electrician for this installation varies. Most electrical technicians charge per hour and the hourly cost is between $40 and $100. You may pay a total quote of between $300 and $2000 depending on the hours spent, size of the chandelier, and service provided. Remember to ask the electrician about the hardware to be used, cleanup, and estimated time needed.

Reach out to us at The Electric Connection
We know how delicate and yet majestic chandeliers are. Our professional, licensed, and experienced electricians are experts at a chandelier installation. We complete the job swiftly and ensure there’s little to clean up afterwards.

What is involved in a House Rewire?

electrical tools for a house rewireRewiring is one of the most difficult, messy, and disruptive maintenance projects you can perform in the home. It is equally time-consuming and costly but very necessary. The lifespan of the electrical installation in a home is usually 25 years. However, this duration can vary depending on use. The electrical system will have to be inspected every 10 years if it is in a privately owned property or every 5 years for a rented property. This inspection guarantees electrical safety.

There are several reasons a homeowner or property investor might consider rewiring a house:

  • You may want to sell an old home and decide a full house rewire is a great way to add value to the property.
  • You may have hired an electrician for a routine inspection and discovered that your electrical system is less than ideal.
  • You may buy an older home and want to be sure of safe and dependable electricity.
  • You may be experiencing tell-tale signs such as flickering lights, warm outlets, mild electrical shocks, dimming lights, tripping switches, blown fuses, and more.
  • You may be carrying out a renovation project.

Whatever your reasons for a house rewire, it is important to know what it involves and what to do or expect.

The Cost
The truth is, a full house rewire doesn’t come cheap. If you consider only the costs first and opt for lower quality service, you may place lives and property in danger. A house rewire must be carried out the right way.

The Process
Usually, this rewiring project may take up to four or five days to complete. The size of your home and the number of electricians working may also influence the time it takes to be completed. The first step for all electricians is to inspect and prepare the property. The wiring in your home is set in the ceiling, behind the walls, and within the floorboards. All of these need to be assessed and exposed to work on. You will also be asked to specify any preferences for outlets. Anything that stands between your wiring and the electricians will be taken down to gain access. This is what makes rewiring disruptive and messy.

The first work stage of the house rewiring process is called the first fix. It involves installing new wiring, cabling, back boxes, and circuits. The lighting and socket positions are labeled to make the second fix stage easier. The second fix stage commences after the first fix and it involves the installation of light fittings, socket fronts, light switches, and isolation switches. Next, the consumer unit is set up and connected to the new wiring system. After this step, your new electrical system will be live but a professional electrician won’t leave just yet. They will proceed to test everything and ensure it meets with electrical standards.

At The Electric Connection we follow this procedure thoroughly and work to make things easier for you. We are quick and professional. We guarantee a safe electrical system that adds value and convenience to your home.

What Do Electrical Contractors Do?

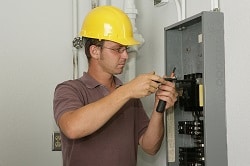
The words ‘electrical contractor and electrician’ are often used interchangeably. Many people do not know the difference between both but assume they mean the same thing. In this article, we will discuss what an electrical contractor does and how they are different from an electrician.

An electrical contractor is a business person or company that performs specialized tasks or construction work in relation to the installation, maintenance, and design of an electrical system. In simpler terms, an electrical contractor can be either a firm or a person who performs electrical tasks. An electrician is a personal tradesman. Electricians are employed by electrical contractors.

Job Duties and Description
The duties of an electrical contractor include the installation and maintenance of electrical systems. These are performed on building wiring, breaker box, switches, light fixtures, and so on. Electrical contractors work on residential, commercial, and industrial setting. Their work hours depend on the task at hand. Electrical contractors work within or outside a home or building, they are not restricted like electricians. For example, they may work on power stations while a regular electrician can’t. There are different types of electrical contractors and this makes their services specialized. Some electrical contractors are skilled in almost all areas.

  • Line Electrical Contractors
    Line or outside contractors work on electrical installations or maintenance which are located outside buildings. This primarily includes working on high-voltage power transmission and distribution lines. They ensure the power plant is functional and distributes power as needed into homes and buildings.
  • Inside Electrical Contractors
    These group of contractors work within the boundaries of a property. They provide cabling, installation, maintenance, rewiring, and repair services within residential, commercial, and institutional buildings.
  • Voice/Data/Video Electrical Contractors
    Also known as Integrated Building System Electrical Contractors, this type of electrical contractors work with low-voltage installations to ensure they are efficient, functional, and energy saving. These include power controls, backup power, wireless networks, energy-efficient lighting, fiber optics, telecommunications, and security systems.

    Becoming an electrical contractor requires an apprenticeship program of 4 years. Electrical contractors learn everything from math, electrical theory, blueprints, work safety, and National electrical codes.

Benefits of Using Electrical Contractors
As a business person or firm, an electrical contractor employs other professional electricians. Hence, work is faster, efficient, and most times affordable. You can also reach out to an electrical contractor for consultation, inspection, and other informational services before hiring to complete the job. They can advise you on the best installations necessary or suitable for your home or building. They can provide energy-saving alternatives and help you establish an overall dependable electrical system. Electrical contractors are experts in troubleshooting services and respond promptly to your needs. With electrical contractors, you are assured of experience, reliability, and professionalism. Unlike an electrician who is an individual tradesman, you can depend on an electrical contractor of a firm. They have integrity and access to all the equipment required for a project. An electrical contractor takes safety seriously. Contact us at The Electric Connection for your outstanding electrical services.